
Introduction
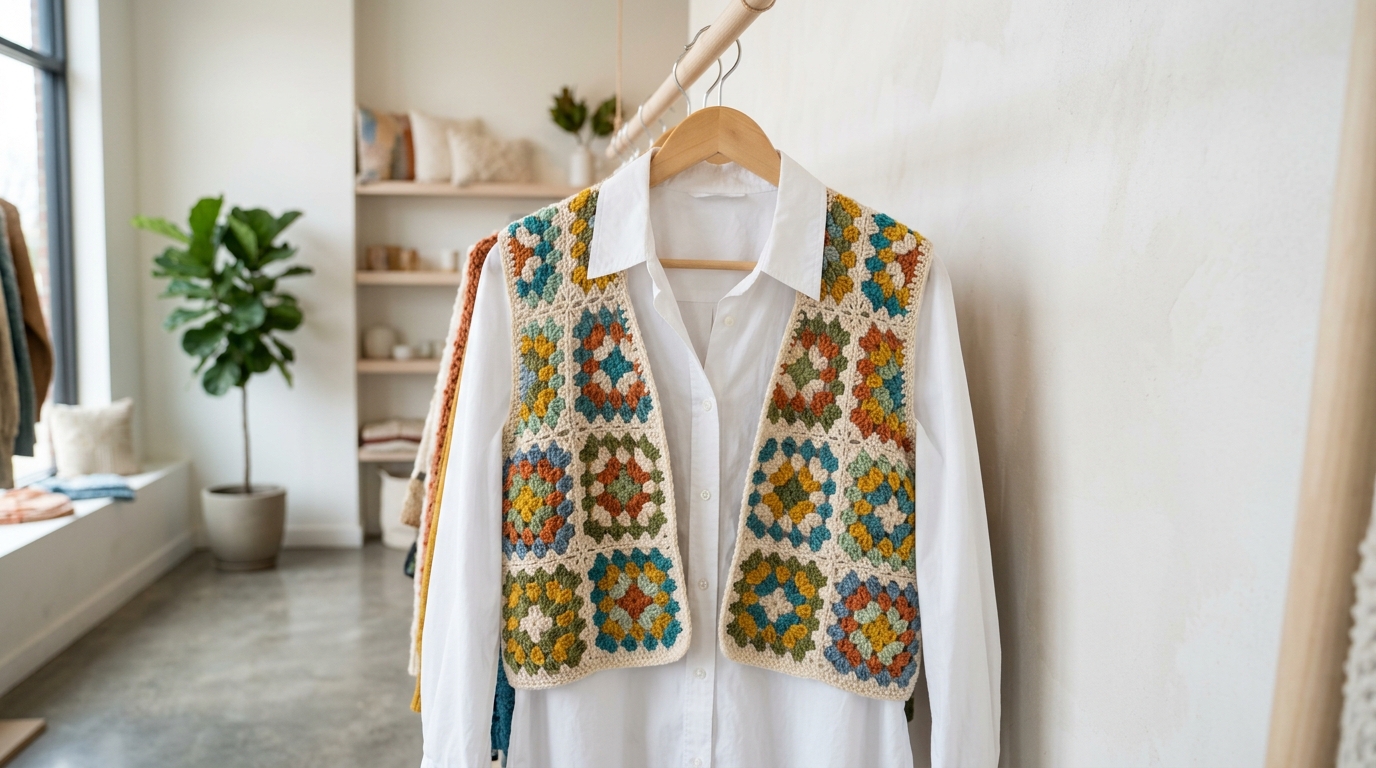
There is something undeniably magical about the transition between seasons. As the air turns crisp and the leaves begin their golden descent, our wardrobes often feel like they need a little extra layering magic. That is where the modern granny square waistcoat comes in. If you have been admiring those chic, textured vests popping up on runways and in boutique windows, you will be delighted to know that they are not only incredibly stylish but also one of the most rewarding projects you can sink your hook into.
A crochet vest is the ultimate “transitional” garment—it adds just enough warmth to keep the chill at bay while remaining breathable and lightweight enough to layer over a simple tee or a crisp button-down shirt. For my beginner friends, this project is a wonderful confidence booster; you are essentially creating wearable art from simple squares. For my intermediate crocheters, this pattern offers a perfect canvas for playing with color palettes, fiber types, and decorative edgings. Above all, this tutorial is designed with your success in mind. We will walk through every step together, from choosing your yarn to mastering that perfectly clean finishing edge, ensuring your new favorite layering piece is as cozy as it is beautiful.
Quick Overview
This project is a joy for all skill levels. It falls under the clothing category and is perfect for everyday wear during the spring and fall seasons, or as a cozy layer in the winter.
- Skill Level: Beginner-Friendly Intermediate. You should be comfortable with basic stitches, but the construction is very accessible.
- Estimated Time: 10 to 15 hours, depending on your speed and the complexity of your color choices.
- Finished Size: Customizable for Small, Medium, Large, and Extra Large.
- Why You’ll Love It: It is a timeless, meditative project that uses the classic granny square technique but evolves into a modern, high-fashion silhouette that fits effortlessly into a modern wardrobe.
Materials or Tools Needed
To create your waistcoat, you will need to gather a few essential items. I always recommend choosing a soft, breathable yarn to ensure your vest feels lovely against the skin.
- Yarn: Approximately 800–1,200 yards of Category 3 (Light/DK) or Category 4 (Medium/Worsted) yarn. Cotton blends or wool-acrylic mixtures work beautifully for structure and softness.
- Crochet Hook: Size H/8 (5.0 mm) is a great go-to, but always check your gauge to ensure a comfortable drape.
- Tapestry Needle: For weaving in those ends. It is worth it to have a few different sizes on hand.
- Stitch Markers: These are essential for keeping your armholes and shoulder seams aligned when joining.
- Measuring Tape: To ensure the fit is just right as you work.
- Scissors: A sharp pair makes the process so much smoother.
Crochet Terms, Stitches, or Key Concepts
We will be using standard U.S. crochet terminology to ensure clarity. Here are the building blocks we will use:
- Slip Knot: The starting point of your project.
- Chain (ch): The foundation of your stitches.
- Slip Stitch (sl st): Used for joining rounds and finishing seams.
- Single Crochet (sc): A short, sturdy stitch perfect for borders.
- Double Crochet (dc): The hero of the classic granny square.
- Granny Cluster: A set of 3 double crochet stitches worked into the same space.
- Fasten Off: The act of cutting your yarn and pulling it through the final loop to secure the work.
- Gauge: The number of stitches and rows per inch. This determines the size of your final vest.
Helpful Notes Before You Start
Before you pick up your hook, let’s talk about tension. Because you are creating a garment that needs to sit nicely on the shoulders, try to keep your tension consistent throughout. If you find your work is becoming too stiff, don’t be afraid to go up a half-size in your hook.
Construction-wise, we will be making a series of panels made from granny squares and then joining them along the sides and shoulders. This method is fantastic because you can try the pieces on as you go. If you are between sizes, I always recommend leaning toward a slightly looser fit—a little extra “ease” makes for a more comfortable, cozy layering piece.
Main Tutorial: How to Craft Your Waistcoat
Part 1: The Granny Squares
Each panel of your vest will be composed of 5-inch granny squares.
- Round 1: Make a magic ring. Chain 3 (counts as your first dc), work 2 dc into the ring, ch 2, 3 dc, ch 2 3 times. Join with a sl st to the top of the initial ch-3.
- Round 2: Slip stitch into the ch-2 space. Ch 3, 2 dc in same space, ch 1, 3 dc in next ch-2 space, ch 2, 3 dc in same space (corner), ch 1. Repeat until you reach the start. Join.
- Round 3: Continue the pattern, working 3 dc in side spaces and 3 dc, ch 2, 3 dc in corner spaces.
- Repeat: Continue until your square measures roughly 5 inches across.
Part 2: Assembling the Panels
For a standard medium-sized vest, you will need 12 squares for the back panel (4×3 grid) and 6 squares for each front panel (2×3 grid).
Layout your squares on a flat surface. Using a tapestry needle and a matching yarn tail, use the “mattress stitch” or a simple “single crochet join” to sew the squares together. Always join with the right sides facing together to ensure the seam remains hidden on the inside.
Part 3: Joining the Sides and Shoulders
Once your three panels (one back, two fronts) are complete, lay the back panel flat. Place the front panels on top, aligning the shoulders.
- Shoulders: Sew the top of the front panels to the back panel, leaving the center open for the neckline.
- Sides: Sew the side seams starting from the bottom hem and stopping about 7–8 inches (depending on desired armhole size) from the shoulder.
- Try it on: Take a moment to slip the vest on carefully. Make sure the armholes feel comfortable. If they are too tight, unpick a few stitches.
Part 4: The Border
To give your vest a professional finish, work a border around the entire outer edge, including the neck and armholes.
- Round 1: Join your yarn at the bottom corner. Work a round of single crochet evenly around the entire perimeter. In the corners, work 3 sc into the same stitch to keep the edge flat.
- Round 2: Work a second round of single crochet, this time in the back loop only for a subtle ribbed texture.
- Fasten off and weave in all remaining ends securely.
Step-by-Step Explanation
Think of this project in three distinct phases: the “small pieces,” the “assembly,” and the “polish.” During the “pieces” phase, don’t worry about the final outcome. Just focus on making each square identical. Use a stitch marker to denote the corners if you find yourself getting lost! Once you move to assembly, it is like putting together a puzzle. Pin your squares carefully before you start joining—this ensures your colors or patterns stay aligned. Finally, the “polish” phase is where the magic happens. A solid border around the armholes and the front opening pulls everything together, hiding any slightly jagged edges and giving your project that boutique, store-bought feel.
Common Mistakes to Avoid
Even experienced crocheters run into snags! Here are the most common pitfalls:
- Tension fluctuations: If your squares are different sizes, your vest will look lopsided. Check your tension at the start of every session.
- Twisted joins: When sewing panels together, double-check that you aren’t accidentally sewing the fabric to itself elsewhere.
- Over-stretching during joining: If you pull the yarn too tightly while seaming, the vest won’t drape; it will pucker. Keep your seams relaxed.
- Ignoring the ends: Skipping the “weave in” phase can lead to your hard work unravelling. Secure your tails with a knot before weaving them back and forth in multiple directions.
Pro Tips for a Better Result
- Steam Blocking: This is the “secret sauce.” Once your vest is assembled, lay it flat on a towel, pin it to the desired dimensions, and use a steamer (or a steam iron held an inch above the surface) to gently mist the fabric. It relaxes the fibers and makes the granny squares pop.
- The Color Rule: If you are using multiple colors, try to keep the center of each square the same color. It creates a subtle, cohesive theme that ties the whole project together.
- Use the Right Hook: If you find the granny squares are creating large gaps, don’t be afraid to drop down a hook size. It makes for a denser, warmer garment.
Variations, Examples, or Personalization Ideas
- Seasonal Styling: Use wool or alpaca for a winter vest, or a bamboo/linen blend for a cool, breezy summer layering piece.
- The Fringe Detail: For a bohemian look, add a 3-inch fringe to the bottom hem. Cut pieces of yarn twice the desired length, fold in half, and use your crochet hook to pull the loop through the bottom edge stitches before knotting.
- Belted Look: Add belt loops at the waist using chain stitches, and crochet a simple matching tie to cinch the vest at the waist.
- Mixed Textures: Try alternating traditional granny squares with “solid” squares (made of half-double crochets) to give the vest a modern, color-blocked aesthetic.
Care, Storage, or Next Steps
Because your vest is likely made of delicate fibers, hand washing is the safest route. Fill a basin with cool water, add a drop of mild wool wash, and gently submerge the vest. Do not wring or twist it! Gently press to remove the water, then lay it flat on a dry towel, reshaping it, and let it air dry in the shade. When storing, fold your vest rather than hanging it; over time, the weight of the crochet can cause it to stretch out of shape if kept on a hanger.
FAQ
Can I make this vest longer to cover my hips?
Absolutely! Simply add more rows of squares to the bottom of the panels before sewing them together.
How do I accurately measure my size for a vest?
Wrap a measuring tape around your bust at the widest point and add 2 to 4 inches of “positive ease” for comfort. This will tell you how wide your combined front and back panels should be.
Can I use different yarn types in one vest?
It is possible, but be careful. Different yarns have different weights and textures, which might make the squares inconsistent. If you do mix, stick to the same “weight” (like all Category 4 yarn).
Why shouldn’t I hang my crochet vest?
Crochet garments, especially those made from natural fibers, have a tendency to stretch under their own weight. Folding them prevents the shoulder seams from becoming distorted.
Is this project really suitable for a total beginner?
Yes! If you can make a double crochet and join a round, you have all the skills needed. The rest is just repeating those simple steps.
Conclusion
Creating your own clothes is one of the most empowering experiences a crafter can have. There is a deep, quiet pride in wearing something that you crafted with your own hands, stitch by rhythmic stitch. This modern granny square waistcoat is more than just a pattern—it is a companion for your wardrobe, a project that will keep you cozy through the seasons, and a reminder of your own creative capability. Whether you are adding a pop of color to a neutral outfit or layering up for a chilly morning coffee run, I know this piece will become a staple in your daily life. Keep your hook handy, your yarn cozy, and keep on creating. I cannot wait to see what you make!