
Introduction
There is something truly magical about finishing a crochet bag. You have spent hours carefully selecting the perfect yarn, watching the stitches bloom row by row, and finally seeing your vision come to life. Whether it is a sturdy market tote, a dainty drawstring pouch, or a chic crossbody bag, the sense of accomplishment is unmatched. However, as any experienced crocheter knows, the transformation from a “craft project” to a “professional accessory” often happens at the very last step: the lining.
Many beginners find the prospect of sewing fabric into their crochet work a little intimidating. After all, we are experts with a crochet hook, not necessarily a sewing machine or a needle and thread! But adding a fabric lining is one of the most transformative skills you can learn. Not only does it provide a beautiful, polished interior, but it also gives your bag structural integrity, preventing it from stretching out of shape when filled with your daily essentials. In this guide, we are going to demystify the process of lining your handmade purses. With a few simple tools and a bit of patience, you will soon be finishing your projects with the confidence of a professional designer.
Quick Overview
In this comprehensive guide, you will learn why lining is a game-changer for your crochet bags and purses. We will cover the essential materials you need, how to prepare your fabric, and the most reliable hand-sewing methods to secure that lining perfectly. This guide is designed for both beginners who are intimidated by needlework and intermediate crafters looking to refine their finishing techniques. By the end of this article, you will feel empowered to add a high-quality interior to every bag you create, increasing both the longevity and the professional appeal of your handmade accessories.
Tools and Materials Needed
You do not need a sewing studio to achieve professional results. Most of the tools required are likely already in your craft room or easily found at any local store.
- Lining Fabric: Look for cotton, linen, or lightweight canvas. Avoid stretchy fabrics like jersey, as they can pull and warp your crochet stitches over time. Cotton prints are especially fun for adding a surprise pop of color inside your bag.
- Sewing Thread: Choose a high-quality, durable polyester thread that matches the primary color of your bag or the background of your fabric.
- Hand-Sewing Needles: A few standard sharp needles are perfect. You may also want a curved upholstery needle if you are working with deeply structured bags.
- Straight Pins or Fabric Clips: These are essential for pinning the fabric in place before you start sewing.
- Sewing Pins with Large Heads: These are easier to handle when moving through thick crochet layers.
- Fabric Scissors: Sharp scissors ensure clean edges.
- Measuring Tape: Accurate measurements of your bag’s interior are the foundation of a perfectly fitted lining.
- Optional: A sewing machine can expedite the process, but as you will see, hand-stitching provides a more controlled finish for delicate crochet work.
Key Concepts of Bag Construction
To successfully line a bag, you need to think about how your specific crochet stitches behave. Crochet is inherently flexible, while most fabrics are stable. This difference is exactly why we need a lining; the fabric acts as a supportive “skeleton” for your project.
When you look at your finished crochet piece, keep these concepts in mind:
- Stitch Density: If your bag has large lacy holes, you will definitely want a lining to prevent small items like lip balm or keys from slipping through.
- Weight Distribution: If you are making a heavy-duty tote, consider using a sturdier fabric like denim or cotton duck to prevent the crochet handles from sagging.
- The “Ease” Factor: You never want your lining to be smaller than the bag itself. It is much better to have a slightly relaxed, roomy lining than one that is too tight, which can cause the crochet to pucker or distort.
Helpful Notes Before You Start
Before you cut into your fabric, take a moment to “block” your crochet bag if you have not already done so. Blocking helps ensure your bag is in its intended shape before you take measurements. If your bag is slouchy or uneven, your lining will mirror those imperfections.
Secondly, always wash and dry your fabric before you begin. Cotton fabric can shrink during its first wash; you do not want to sew a perfectly sized lining into your bag only to have it shrink after the very first time you throw it in the laundry.
Preparing the Fabric
The success of your lining depends on the accuracy of your pattern pieces. Do not try to guess the size by eye—use your measuring tape to get the height and width of the bag’s interior. Use these steps to guide your cutting process:
- Create a Paper Template: Before cutting your expensive fabric, trace the outline of your bag onto a piece of newspaper or parchment paper. Make sure you add at least a 1/2-inch seam allowance around all sides.
- Double-Check Your Measurements: Fold the paper template and place it inside your bag. Does it fit comfortably? Can you reach the bottom? Do you have enough room at the top to fold over a hem? Adjust your paper template until it feels just right.
- Cutting: Lay your fabric flat on a hard surface and pin your template to it. Cut your fabric, creating two identical panels for the front and back of the bag.
Creating the Lining Pouch
Once you have your two fabric pieces, it is time to assemble them into a pouch that mirrors the shape of your bag.
- Pinning Right Sides Together: Place the right sides (the “pretty” side) of the fabric together. Use your pins or fabric clips to secure the sides and bottom.
- Stitching the Seams: Sew along the sides and bottom of your fabric, leaving the top edge open. Aim for a 1/2-inch seam allowance. If you are sewing by hand, a simple backstitch is incredibly strong and reliable.
- Securing the Corners: If your bag has a flat bottom, you can “box” the corners of your fabric pouch to match. While the fabric is still inside-out, pull the bottom corner to create a triangle, measure about an inch from the tip, and sew a line straight across. This creates a gusseted bottom that fits perfectly inside a square-bottomed crochet bag.
Installing the Lining
Now for the rewarding part: uniting the two pieces.
- Placement: Turn your crochet bag right side out. Keep your fabric lining inside-out for a moment, then slide the lining into your bag.
- Aligning the Top: Match the raw top edge of your fabric lining to the inside rim of your crochet bag. Turn the raw edge of the fabric inward by about 1/2 inch to create a clean hem.
- Pinning: Using your sewing pins, pin the fabric hem to the inside of the crochet bag. Space your pins about an inch apart to ensure the fabric stays even as you work.
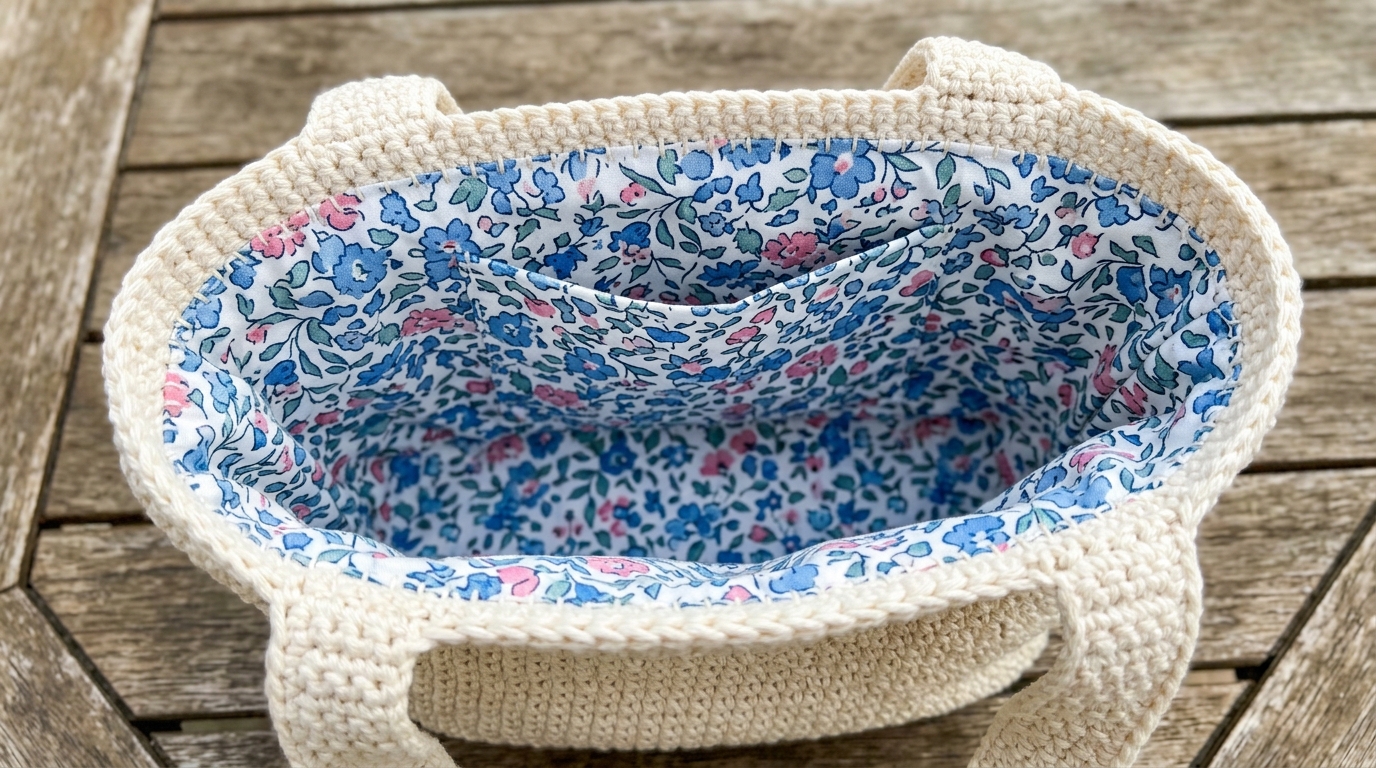
- The Slip Stitch Finish: This is the most popular technique for connecting fabric to crochet. Using a sewing needle and thread that matches your yarn, catch a small loop of the crochet stitch on the inside of the bag, then pass the needle through the fabric hem. Continue this process all the way around the opening. By using a slip stitch, your thread will be nearly invisible, and it will allow for the natural stretch and give of the crochet fabric.
Common Mistakes to Avoid
Even skilled makers run into snags when tackling their first lining project. Here are a few things to keep in mind:
- Over-Stretching: Never pull on your crochet bag while pinning the lining. The weight of the bag may naturally stretch it slightly, but if you pin it while it is under tension, you will end up with a rippled, uneven finish.
- Ignoring Thread Weight: Do not use super thick yarn or heavy embroidery floss to sew the lining in unless it is part of the design aesthetic. Standard sewing thread is stronger and much easier to hide.
- Skipping the Hem: Never leave raw edges of fabric exposed. They will fray over time and create a messy interior. Always fold the raw edge inward for a clean, professional finish.
- Tight Stitches: When sewing the lining to the bag, do not pull your thread so tightly that it draws the crochet stitches inward. Keep your tension relaxed so the bag keeps its intended shape.
Pro Tips for a Better Result
The difference between a “homemade” look and a “boutique-quality” item often lies in the details. Here are a few tips to elevate your work:
- Add an Interior Pocket: Before you sew your two fabric pieces together, pick a scrap of coordinating fabric, hem the top, and sew it onto the “right side” of one of your lining panels. Now you have a built-in pocket for your phone or lip gloss!
- Magnetic Snaps: If you want your bag to close securely, install a magnetic snap into the fabric lining before you sew it into the bag. It is much easier to attach these to fabric than it is to attach them directly to crochet.
- Interfacing: If your crochet bag is made with a soft yarn like cotton or acrylic, it might be a bit limp. Use iron-on, fusible interfacing on the wrong side of your fabric pieces before sewing the pouch. This gives the lining a stiff, professional structure that makes the whole bag stand up on its own.
Variations and Personalization Ideas
Lining is a fantastic opportunity to inject your personal style into a project. Perhaps you have a neutral, earth-toned crochet bag that looks lovely in the winter—consider a vibrant, floral-print cotton lining for a “secret garden” surprise every time you open it.
For seasonal gifts, match the interior fabric to the occasion. A festive Christmas print makes a market bag feel like a perfect holiday gift, while a lightweight, nautical-themed pattern is ideal for a summer beach bag. You can even use repurposed items! An old silk scarf or a vintage cotton pillowcase can be a beautiful, eco-friendly way to line your bags.
Care and Troubleshooting
A lined bag requires slightly different care than an unlined one. Always check the labels on both your yarn and your fabric. Generally, hand-washing in cool water with a gentle detergent is the safest way to clean a lined crochet bag. Avoid tossing the bag in the dryer, as the heat may cause the fabric lining and the yarn fibers to shrink at different rates, potentially causing the lining to buckle. Instead, lay your bag flat to dry, reshaping it gently as needed.
If your lining starts to pull away in one spot after a few months of heavy use, don’t worry! That is the beauty of hand-sewing. You can easily snip the old thread, re-pin that section, and secure it again with a few quick stitches.
FAQ
Is it necessary to line a small crochet purse?
It is not strictly necessary for every project, but it is highly recommended. Linings prevent small items from falling through gaps in the stitches and keep the purse from stretching out when it is loaded with heavy items.
Can I use a sewing machine for the lining?
Absolutely! You can use a sewing machine to assemble the actual fabric pouch. However, when it comes to attaching that pouch into the crochet bag, hand-sewing is almost always better. It gives you much more control and creates a cleaner, more delicate look.
How do I stop the lining from sagging?
The best way to prevent sagging is to ensure your lining is slightly smaller than the bag itself, and to securely tack it in place at the top rim. If your bag is very large, you can add a few extra “anchor stitches” at the base of the bag to hold the fabric bottom in place.
What if I don’t know how to sew?
The techniques required for lining a bag are very basic. If you can thread a needle and perform a simple running stitch or slip stitch, you have all the skills you need. There is no need for complex couture techniques!
Does the lining make the bag heavier?
It adds a very negligible amount of weight, but the benefits in terms of structure and protection far outweigh the slight increase in ounces. In fact, most people find that a lined bag feels more “complete” and substantial.
Conclusion
Lining your handmade crochet bags is one of the most rewarding skills you can add to your toolkit. It is the bridge between a project that looks like a hobby and an accessory that looks like a work of art. While it might seem intimidating to pick up a needle and thread, remember that your hands are already skilled at precision and focus—you have already mastered the art of crochet, one of the most complex hobbies out there!
Take your time, choose a fabric that brings you joy, and don’t be afraid to experiment. With each bag you line, you will get faster, your stitches will get neater, and your finished items will become more polished. Your crochet bags are labors of love, and giving them a beautiful, sturdy interior is the ultimate way to honor the hard work you put into every stitch. Happy creating!