
Introduction
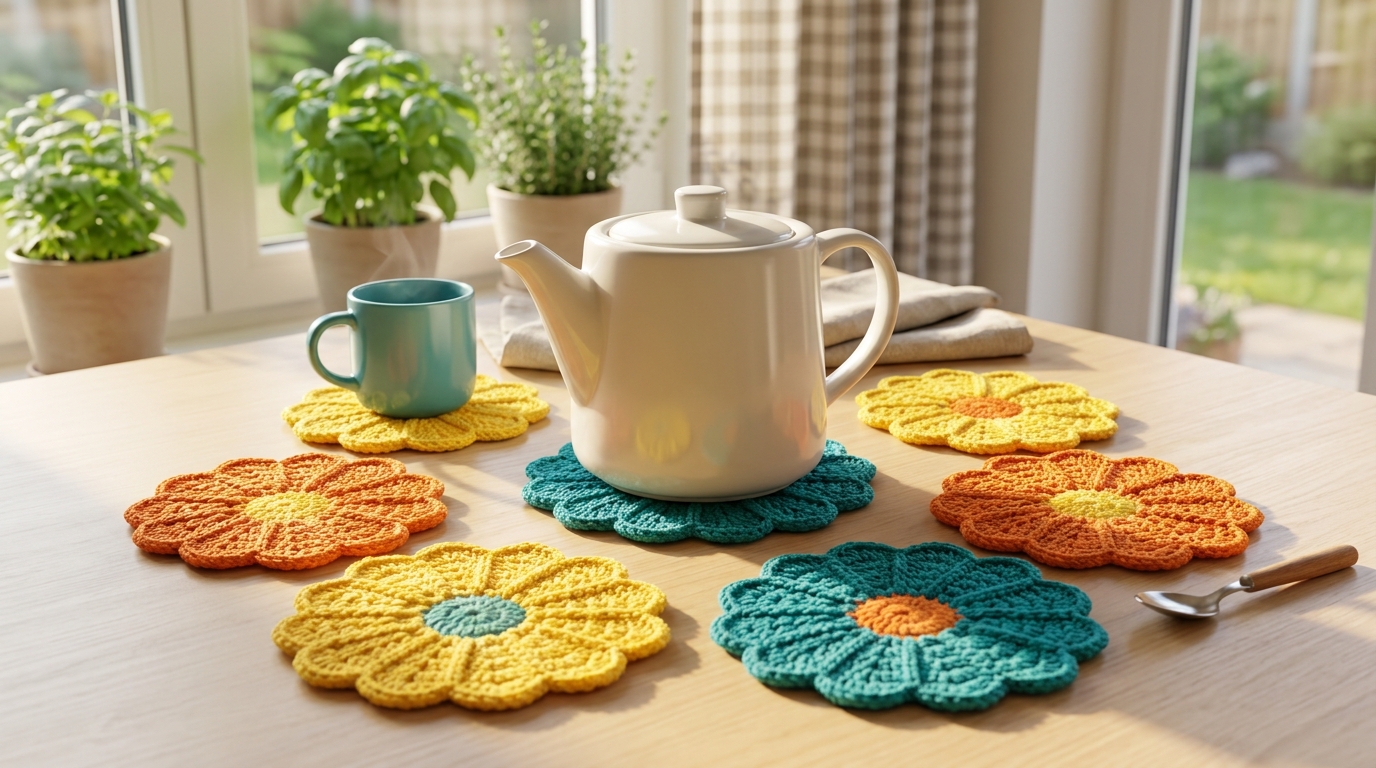
There is something truly magical about the way a simple ball of yarn and a single hook can transform a kitchen table. If you have been looking for the perfect project to add a touch of handmade warmth to your home, or perhaps you are searching for a heartfelt, DIY gift for a friend, these cheerful flower-shaped coasters are the answer. Crocheting for the home is one of the most rewarding ways to spend an afternoon; it is meditative, productive, and results in a beautiful piece of decor that you will use every single day.
Whether you are a complete beginner holding a crochet hook for the first time or an intermediate crafter looking for a quick and satisfying stash-buster project, this tutorial is designed for you. These coasters are small enough to complete in a single sitting, making them ideal for those moments when you need a creative escape. In this article, I will guide you through the process of creating a matching set of colorful floral coasters, from selecting the right yarn to mastering the final stitch. Not only will I provide a clear, step-by-step pattern, but I’ll also share my favorite professional finishing tips to ensure your coasters lay perfectly flat and look polished enough to give as a professional-quality gift. Let’s dive into this cozy, blooming project together!
Quick Overview
This project is a perfect entry point for those learning to work in the round. You will be creating a vibrant, petaled flower coaster that measures approximately five inches in diameter.
- Skill Level: Beginner-friendly.
- Time Commitment: Approximately 30 to 45 minutes per coaster.
- Finished Size: 5 inches across.
- Best Use: Kitchen table decor, a thoughtful housewarming gift, or a colorful addition to your desk space.
- Why You Will Love It: It works up quickly, allows for endless color combinations, and is an excellent way to practice basic stitch techniques like the adjustable ring, double crochet, and joining rounds.
Materials and Tools Needed
To create these coasters, you don’t need an extensive collection of supplies. In fact, this project is perfect for using up those colorful cotton yarn scraps you have hidden in your stash.
- Yarn: Medium-weight (worsted/size 4) 100% cotton yarn. Cotton is essential here because it is absorbent, heat-resistant, and maintains its shape well under a coffee mug.
- Crochet Hook: Size H (5.0 mm) is standard, but if you tend to crochet loosely, you might consider dropping down to a G (4.0 mm) hook to keep the stitches tight and tidy.
- Tapestry Needle: For weaving in your ends securely.
- Stitch Marker: Helpful for marking the start of your rounds, especially if you are new to working without turning.
- Small Scissors: For trimming your yarn neatly.
Crochet Terms and Key Concepts
Before we begin, let’s get comfortable with the terminology. We use standard U.S. crochet terms in this set:
- Magic Ring (Adjustable Ring): A technique for starting a project in the round, allowing you to pull the center tight so there is no gap in the middle.
- Chain (ch): The basic foundation stitch.
- Single Crochet (sc): A compact, dense stitch that provides structure.
- Double Crochet (dc): A taller stitch that works up quickly, perfect for the petals of our flowers.
- Slip Stitch (sl st): Used to join rounds or move across stitches without adding height.
- Fasten Off: Cutting the yarn and pulling the tail through the final loop to secure your work.
Helpful Notes Before You Start
Tension is the secret ingredient to a beautiful coaster. Because these items will hold beverages, you want your stitches to be relatively tight so that condensation doesn’t seep through too easily. If you find your work is looking a bit “holey,” don’t be afraid to go down a hook size. Additionally, practicing your “magic ring” is a great habit—if it feels tricky at first, know that it gets easier with every single repetition. Remember to weave your ends in on the back side of the coaster using a tapestry needle; leaving them too short can lead to them popping out after a wash.
Main Tutorial: The Blooming Flower Coaster
This pattern uses a two-tone approach: one color for the center (the “stamen”) and a contrasting color for the petals.
Part 1: The Center
Using your first color choice:
- Round 1: Start with a magic ring. Chain 2 (counts as a stitch). Work 11 double crochet stitches into the ring. Join to the top of the beginning chain with a slip stitch. Pull the center tightly closed. (12 stitches total, including the starting chain).
- Round 2: Chain 2, double crochet in the same stitch. Work 2 double crochet in every stitch around. Join with a slip stitch to the top of the first chain. (24 stitches). Fasten off.
Part 2: The Petals
Join your petal color in any stitch from Round 2.
- Round 3: Chain 3 (counts as a double crochet), work 2 more double crochet in that same stitch. Chain 2, skip the next stitch, and single crochet into the following stitch.
- Creating the Petal: Chain 2, skip the next stitch, 3 double crochet in the next stitch, chain 2, skip the next stitch, single crochet in the next.
- Repeat the pattern within the asterisk until you reach the end of the round. You should have 6 large, beautiful petals. Join with a slip stitch to the first chain of the round.
Assembly and Finishing
Once you have finished your final slip stitch, pull a long tail of yarn through the loop and pull tightly to knot. Take your tapestry needle and weave the yarn tail back and forth through the stitches on the back side of the coaster. Do this for at least an inch to ensure it stays secure even after being tossed in the washing machine. Trim any remaining excess yarn close to the fabric.
Step-by-Step Explanation
When you look at your coaster, notice how the petals bloom outward. If you used the same color for the center and the petals, it will look like a solid floral motif. If you used two colors, the contrast draws the eye to the center “pollen” area. At each stage, ensure your stitch count remains consistent. If your coaster starts to curl like a bowl, your tension might be a little tight; if it ripples like a frilly skirt, your stitches might be a little too loose. The beauty of cotton yarn is that if you make a mistake, you can simply “frogged” or pull back the yarn and try again without damaging the fibers.
Common Mistakes to Avoid
Even experienced crocheters run into these snags. Avoid them by keeping these tips in mind:
- The “Twisted” Starting Chain: When joining your first round, ensure your stitches don’t twist around the hook. Take a second to lay it flat before you make that first slip stitch.
- Ignoring the Yarn Label: We mentioned choosing 100% cotton. Avoid acrylic for coasters, as acrylic fiber can melt if a very hot tea or coffee mug is placed directly on it.
- Not Weaving Ends: It is tempting to tie a knot and snip, but knots can feel bulky under an uneven ceramic mug. Weaving ends is the professional way to ensure a flat, smooth, and long-lasting finish.
- Skipping the Join: When working in rounds, it is vital to join correctly so your final petal doesn’t look disconnected from the first. Always count your stitches at the end of every round!
Pro Tips for a Better Result
Want to take your work to the next level? Try these techniques:
- Blocking: This is the game-changer every beginner needs to know. Once your coaster is done, dampen it with a spray bottle, pin it flat onto an ironing board or a towel, and let it dry overnight. This forces the stitches into a perfect, uniform shape.
- Color Theory: Think about your kitchen decor. If you have a neutral, modern kitchen, consider making a set of white or cream floral coasters. For a bright, bohemian space, try teal, mustard, and rust for a sunset-inspired set.
- Consistency: Try to complete all the coasters in a set during the same crafting session. Our tension can change slightly from day to day, so keeping your “crochet vibe” consistent will help your set look perfectly uniform.
Variations and Personalization Ideas
The beauty of a basic coaster pattern is how easily it can be adapted.
- Size It Up: Want a larger trivet for a teapot? Simply continue adding increase rounds to the center part (example: work 2 double crochet in every other stitch for a third round) before starting your petal round.
- Seasonal Swapping: Create the center in brown and the petals in orange or deep red for a gorgeous fall-themed set. Use bright pastels for a spring-inspired, Easter-themed gift set.
- Embellishment: If you are feeling extra creative, you can sew a small pearl bead into the exact center of the coaster for a touch of elegance, though keep in mind this might make the coaster slightly wobbly if your mug has an uneven base.
Care and Storage
Your cotton coasters are durable and easy to maintain. If they get a coffee stain or a bit of dust, simply toss them in a small mesh laundry bag and wash on a gentle, cool cycle. Lay them flat to dry on a clean towel. Avoid the dryer if possible, as high heat can dry out cotton fibers and cause them to feel stiff over time. To store them, stack them neatly near your coffee station or keep them in a small decorative basket.
FAQ
Can I use acrylic yarn for these coasters?
While you can, it is not recommended for items that will hold hot mugs. Acrylic is a plastic-based fiber and can melt or deform if it comes into contact with high heat. Cotton is always the best choice for kitchen textiles!
Why does my coaster look like a bowl?
This usually means your tension is too tight or you have too few stitches in your rounds. Try relaxing your grip on the yarn or go up a half-size in your hook. Blocking your finished project can also help smooth out slight curling.
How do I stop the yarn tail from showing?
Always weave your tails into the back (the “wrong side”) of the work. If you pull the yarn through the center of the double crochet stitches, it will be virtually invisible.
Can I make these larger?
Absolutely! If you want a tea-pot sized trivet, just keep increasing the center round by adding more “2 double crochet in a stitch” increases before finishing off with the petal round.
Is this pattern beginner-friendly?
Yes! It uses basic stitches combined in a simple way. If you know how to make a chain and a double crochet, you have all the skills needed to finish this project.
Conclusion
Creating your own set of flower-shaped coasters is more than just a quick craft; it is a way to infuse your daily rituals with a bit of love and personality. Imagine reaching for your morning coffee and placing it on a coaster you handmade yourself—it’s a small, daily reminder of your creativity and the time you took to make something beautiful.
I hope you found this guide helpful and that you feel inspired to pull out your yarn and start hooked-creating today. Remember, every stitch is progress, and there is no such thing as a “perfect” project—only a project filled with your own unique touch. Whether you are gifting these to a loved one or keeping them all to yourself, enjoy the process of turning simple string into a blooming floral design. Happy crocheting!