
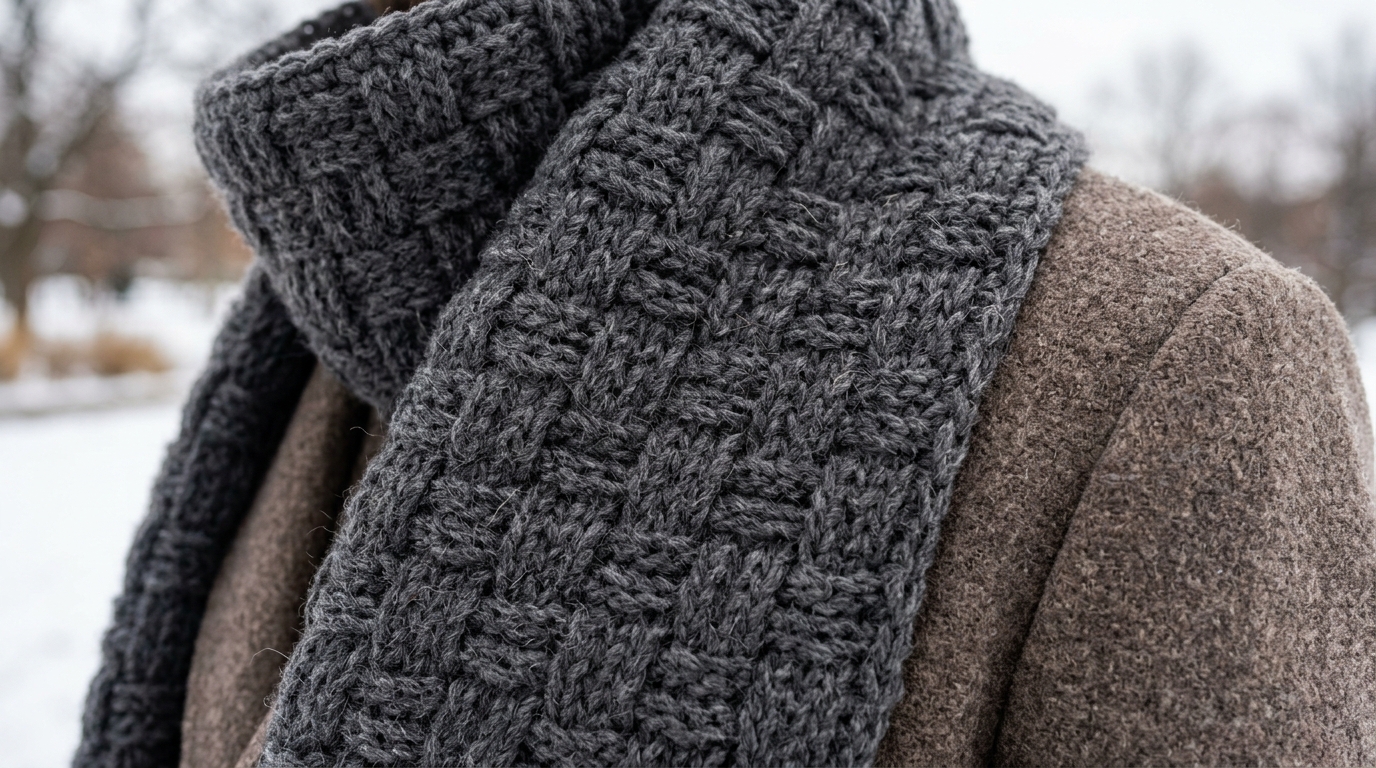
There is something truly magical about the arrival of the first crisp, autumn breeze that turns into the biting chill of mid-winter. As the days shorten and the sweaters come out of storage, many of us find our fingers itching for our yarn and hooks. There is no joy quite like the process of watching a skein of soft, squishy yarn transform into a protective barrier against the cold. A scarf is perhaps the quintessential winter project; it is the perfect companion for a quiet afternoon by the fire, a thoughtful handmade gift for a loved one, or simply a way to add a touch of warmth and style to your daily commute.
If you have ever found yourself staring at a wall of yarn, wondering which texture will provide the best balance of warmth, flexibility, and visual appeal, you aren’t alone. Some stitches create a beautiful drape but let all the warmth escape, while others are lovely to look at but become stiff and heavy. Today, we are going to dive into the absolute best stitch for a cozy winter scarf: the Thermal Half Double Crochet. It creates a dense, squishy, almost quilted fabric that traps heat beautifully, making it the perfect choice for those frigid January days. Whether you are a brand-new beginner looking for your first non-blanket project or an experienced maker wanting to refine your technique with a professional-looking finish, this tutorial will guide you through every loop.
Quick Project Overview
Choosing the right project for a chilly season is all about balancing speed with comfort. This scarf pattern is designed to be elegant in its simplicity, relying on the texture of the stitches rather than a complicated lace pattern.
- Skill Level: Beginner-Friendly Intermediate. If you can chain and half double crochet, you have the skills required; the “thermal” effect comes from where you place your hook.
- Estimated Time: 8 to 12 hours of total crafting time.
- Finished Size: Approximately 7 inches wide by 65 inches long (easily customizable).
- Best Use: The ultimate winter accessory. Its thickness makes it perfect for bundling up under a winter coat.
- Why You’ll Love It: This stitch creates a “double-thick” fabric without needing to work two layers separately. It is squishy, comfortable, and provides a polished, high-end look.
Materials Needed
To achieve that signature winter warmth, your choice of materials is vital. For this project, you will need:
- Yarn: Approximately 450–500 yards of worsted weight (Category 4) yarn. I highly recommend a wool or alpaca blend for natural thermal properties. A smooth yarn will show off the stitch definition best.
- Crochet Hook: Size H/8 (5.0 mm).
- Tapestry Needle: For weaving in your ends securely.
- Scissors: A sharp pair makes all the difference.
- Measuring Tape: To ensure consistent length.
- Locking Stitch Markers: Optional, but very helpful for keeping your row ends straight.
Stitches and Abbreviations
We will be using standard U.S. crochet terminology throughout this pattern. Familiarizing yourself with these abbreviations will make your workflow much smoother.
- Ch (Chain): Yarn over, pull through the loop on your hook.
- Hdc (Half Double Crochet): Yarn over, insert hook into stitch, yarn over, pull up a loop, yarn over, pull through all three loops on the hook.
- Thdc (Thermal Half Double Crochet): This is our “special” stitch. You will be working into the back loop of the current row and the exposed bottom loop of the previous row simultaneously.
- St (Stitch): The individual loop or V-shape at the top of your crochet.
- Sl St (Slip Stitch): Insert hook into stitch, yarn over, pull through the stitch and the loop on your hook.
- Fo (Fasten Off): Cut the yarn and pull the tail through the final loop to secure it.
Pattern Notes Before You Start
This scarf is worked in rows, back and forth. The most important thing to keep in mind is your tension. Because we are working in the “thermal” style, the fabric will be naturally thicker than standard crochet. If your stitches feel tight, don’t be afraid to go up a half-size in your hook.
The “thermal” effect is achieved by catching an extra loop. Don’t panic if it feels slow at first; it takes a few rows to get into the rhythm. Once you find the “groove,” you will see the beautiful, ridge-like texture emerging. Remember that your beginning chain does not count as a stitch, so always work your first stitch into the very first base stitch of the row.
Full Crochet Pattern
Part 1: The Foundation
Start by making a slip knot and placing it on your hook. Chain 30. This width will give you a sturdy, substantial scarf. If you prefer a wider wrap, simply chain any number of stitches until you reach your desired width.
Part 2: Establishing the Base
Row 1: Hdc in the third chain from the hook and each chain across. You should have 28 stitches (or your total chain count minus two). Chain two and turn.
Part 3: The Thermal Rows
Row 2: Look at your work. You will see the top V-shape of your stitches, but you will also see a horizontal bar just below the V-shape on the side facing you. To work the thermal stitch, yarn over, insert your hook into the back loop of the current stitch AND the “front” loop (the bar) of the stitch from the row below. Pull up a loop, yarn over, and finish your half double crochet as normal. Continue this across the entire row. Chain two and turn.
Repeat Row 2 until the scarf reaches your desired length—usually 60 to 70 inches for a comfortable adult wrap.
Finishing
Once you have reached your target length, chain one and cut your yarn, leaving a six-inch tail. Pull the tail through the final loop and tighten. Use your tapestry needle to weave the tail back and forth through the stitches, hiding it securely within the thickness of the scarf. Do the same for your starting tail.
Step-by-Step Tutorial Explanation
When you sit down to start Row 2, the process might feel slightly foreign. Think of it as “sandwiching” the previous row. By inserting your hook into the back loop of your current row and that little horizontal bar from the previous row, you are effectively locking two layers of fabric together.
As you progress, the “wrong side” of the scarf will look like a series of clean, horizontal ridges, while the “right side” will have a beautiful, stacked appearance. By the time you reach the fifth row, you will notice that the scarf feels much sturdier than a traditional single crochet or double crochet fabric. This is the “thermal” magic! If you find that your edges are curling, try to consciously soften your tension on the last stitch of every row.
Common Mistakes to Avoid
The most common pitfall when working this pattern is losing track of your stitch count. Because the thermal stitch creates a thick, layered edge, it is very easy to accidentally skip the final stitch of a row or add one by mistake. Count your stitches every five rows to ensure you are maintaining a nice, straight rectangle.
Another common issue is a twisted starting chain. Take an extra moment to ensure all your chains are facing exactly the same way before you work that first row of half double crochets. If the chain is twisted, the entire scarf will have a permanent, awkward spiral that is nearly impossible to fix later. If you find your edges are uneven, place a stitch marker in the first and last stitch of every row until you are comfortable identifying them by sight.
Pro Tips for a More Beautiful Result
To elevate your project from “handmade” to “custom boutique,” consider these professional techniques:
- Tension Consistency: If you are a naturally tight crocheter, you may find your scarf becomes a bit stiff. Try moving up one hook size larger than what is recommended on your yarn label.
- The Power of Blocking: Even a simple scarf benefits from blocking. Once finished, dampen your scarf with water, gently stretch it to the desired dimensions on a towel, and let it dry pinned down (or just weighted with books). This relaxes the yarn fibers and creates a professional, finished look.
- Yarn Selection: Choose a “plied” yarn rather than a single-ply yarn. Plied yarns are much less prone to pilling and snagging, ensuring your hard work lasts for many winters to come.
- Styling: A scarf with this much texture works beautifully when worn with a simple, solid-colored wool coat. Let the texture of the crochet be the star of the show.
Variations and Personalization Ideas
The beauty of this pattern is its versatility. Once you have mastered the thermal stitch, you can personalize your scarf in several ways:
- Color Blocking: Use two different colors of yarn and switch them every 20 inches to create a modern, color-blocked accessory.
- The “Infinity” Option: Instead of fastening off, you can join the two ends together using a slip stitch, creating an infinity scarf. This is a favorite for people who are always on the go and don’t want a scarf end hanging loose.
- Adding Fringe: If you want a more bohemian or traditional winter look, cut long strands of yarn and knot them into the ends of your scarf. Use a comb to gently brush out the fringe for a fluffy, finished appearance.
- Baby Version: Scale down the chain to 15 stitches and use a soft, cotton-blend yarn to create a thick, cozy bib or neck warmer for a little one.
Care Instructions
Handmade scarves, especially those made with natural fibers like wool, deserve a little love. To keep your scarf looking pristine, always hand wash it in cool water with a gentle, wool-specific detergent. Avoid wringing the piece, as this can stretch the fibers and ruin the shape. Instead, gently squeeze the excess water out using a towel, then lay it flat to dry on a mesh surface or another clean towel. Never hang your scarf to dry, as the weight of the water will pull on the stitches and cause the scarf to grow longer than you intended.
FAQ
How do I stop my edges from getting wobbly?
Wobbly edges often come from irregular tension or missing the final stitch of the row. Use a stitch marker in the first and last stitch of every row to make sure you know exactly where to go.
Can I use a bulky yarn for this pattern?
Absolutely! If you use a bulkier yarn, just keep in mind that you may want to decrease your starting chain count (perhaps to 20 or 25) so that the scarf doesn’t end up too wide to wrap comfortably around your neck.
Why does my scarf feel stiff?
The thermal stitch naturally creates a denser, heavier fabric. If you feel it is too stiff for your liking, don’t be afraid to go up a full hook size or two. The goal is a “squishy” feel, so experiment until you find the drape you love.
How do I switch yarn colors cleanly?
When you are on your last loop of the final stitch of a row, drop the old color and pull the new color through to finish the stitch. This creates a seamless transition without needing to tie bulky knots.
Is this a good project for a total beginner?
Yes! If you are comfortable working a basic half double crochet, this is a wonderful project. It teaches you how to look at the anatomy of your stitches, which is a foundational skill for all intermediate and advanced crochet projects moving forward.
There is a profound sense of satisfaction that comes from finishing a project that will actually keep you warm. Knitting or crocheting for the winter isn’t just about the finished object—it’s about the hours spent creating something cozy with your own two hands. I hope this guide provides you with a relaxing and enjoyable experience. Whether you are gifting this scarf or adding it to your own winter wardrobe, know that you have created something made with patience, care, and a lot of heart. Happy crocheting!