
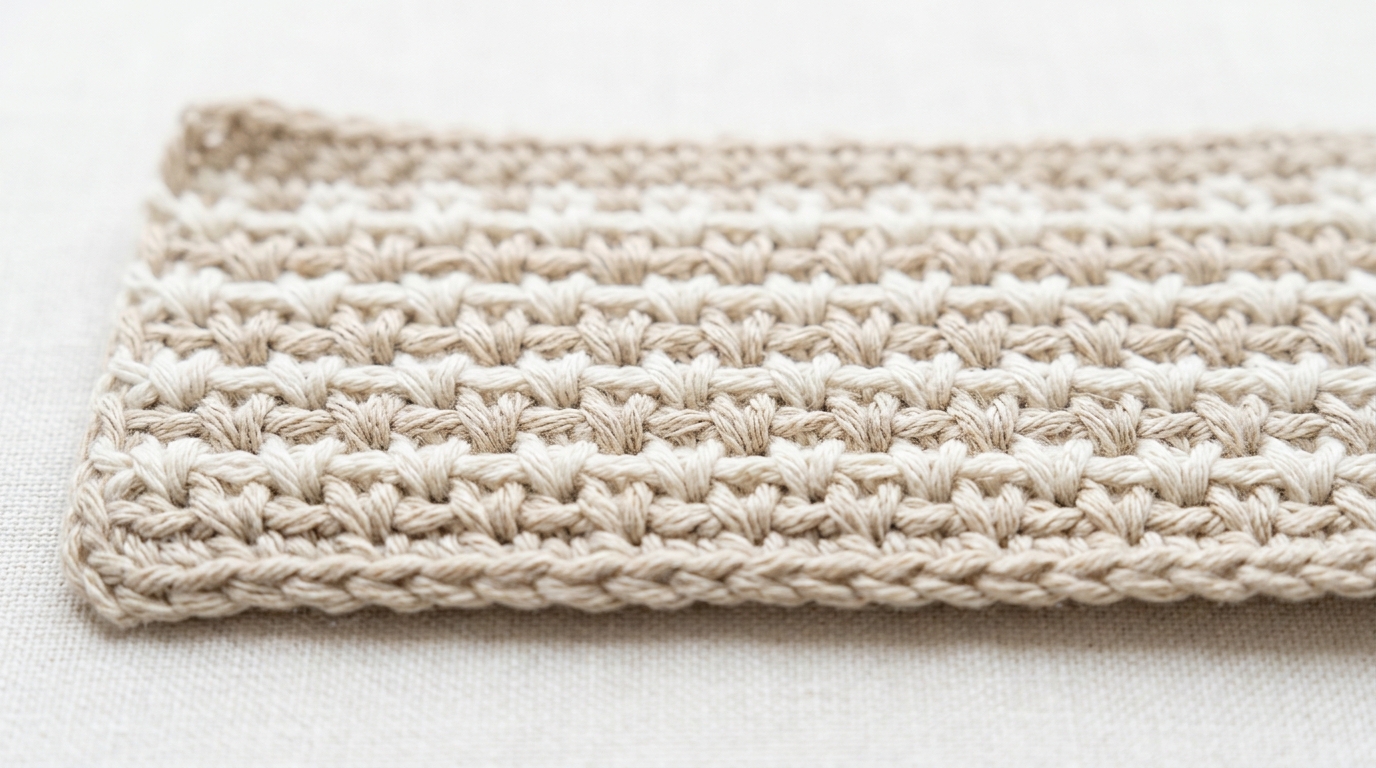
There is something truly meditative about the rhythm of certain crochet stitches, and the moss stitch—often called the linen stitch or granite stitch—is perhaps the most soothing of them all. If you have been searching for a technique that creates a fabric with a sophisticated, woven-like appearance that is durable, squishy, and elegant, you have found your match. The moss stitch is a beloved staple for crocheters of all levels because it requires only the most basic building blocks of crochet: the chain and the single crochet.
Despite its simplicity, the results are remarkably professional. The texture is dense enough to provide warmth in a blanket or scarf but flows beautifully, making it perfect for garments as well. Whether you are a brand-new beginner looking to elevate your first project beyond basic rows or an experienced maker needing a “mindless” project for an evening of movie watching, the moss stitch is a gorgeous, versatile tool for your crochet library. In this guide, I will walk you through everything you need to master this “linen” texture, ensuring your tension is perfect and your edges are as straight as can be.
Quick Overview
This educational guide is designed for beginners and intermediate crocheters alike who want to master the moss stitch. You will learn the mechanics of the stitch, why certain chain counts matter, how to maintain even tension, and how to troubleshoot the most common pitfalls. Mastering the moss stitch will give you the confidence to start your next blanket, scarf, or home decor accessory with a stitch that looks far more intricate than it actually is. It is the perfect foundational skill for any enthusiast, as it forms the basis of many modern, high-fashion crochet patterns seen in handmade boutiques today.
What You Need to Know Before Starting
You do not need fancy equipment for this stitch. In fact, one of the beauties of the moss stitch is that it works up perfectly with whatever yarn and hook you currently have on hand. For practice, I recommend a medium-weight (worsted) acrylic, cotton, or wool blend yarn and a corresponding hook size (typically an H/8 or 5.0mm).
Because the moss stitch is worked by placing single crochet stitches into the chain spaces of the previous row, having a yarn that is not too “fuzzy” or dark in color makes it much easier to see where your hook should go. Lighter-colored yarns, like soft pastels or creams, are wonderful for your first attempt because they highlight the distinct “v” shapes of your stitches and the gaps created by the chains.
Key Concepts and Terminology
Before we dive into the steps, let’s define the terminology. Even if you have been crocheting for a while, it helps to keep these concepts clear:
- Single Crochet (sc): The standard workhorse stitch.
- Chain (ch): The basic foundation of the fabric.
- Chain Space (ch-sp): The hole created by a chain stitch in the previous row. This is where your hook will “live” for the moss stitch.
- Turning Chain: The chains at the beginning of a row that bring your hook up to the proper height for the next row.
- Foundation Chain: Your starting sequence of chains. For the moss stitch, this must always be an even base number.
The “secret” of the moss stitch is this: you are working a single crochet, then skipping a stitch, then chaining one. The next row flips the behavior, working into the chain space you just created. It is this alternating “sc, ch-1, skip” movement that creates the mossy, woven texture.
Helpful Notes for Success
The most common issue with the moss stitch for beginners is “shifting” or accidental increases. Because the row ends with a single crochet in a chain space, it is incredibly easy to miss that final stitch or add an extra one.
Pro Tip: Use a locking stitch marker in the first and last stitch of every row. This will help you keep your rectangular shape perfect, preventing the common “triangular” or “slanting” edge that often happens when beginners inadvertently skip or double up on their end stitches.
Additionally, keep your tension consistent. The moss stitch involves chains, which can sometimes be worked much tighter than single crochet stitches. If you find your chain spaces are too small to fit your hook comfortably, try going up a half-size in your crochet hook just for the foundation chain, or focus on pulling up a slightly longer loop when you make your chain stitches.
Understanding the Mechanics
The moss stitch is fundamentally an “offset” pattern. Imagine a brick wall; the bricks are never stacked perfectly on top of each other, but rather layered so the joints fall in the middle of the brick below. The moss stitch does the same with your stitches.
Every row consists of a single crochet followed by a chain stitch. By moving over one stitch and working into the space, you ensure that the second row fills in the gaps of the first. This creates a dense, interlocking fabric that feels sophisticated and expensive.
Step 1: The Foundation
To begin, make a slip knot and place it on your hook. Chain an even number of stitches—let’s say 20 or 30 for a practice swatch.
Step 2: The First Row
You will place your first single crochet into the fourth chain from the hook. This creates the first “loop” of your movement. Chain one, skip the next foundation chain, and work a single crochet into the following chain. Repeat this pattern across your foundation chain until you have two stitches remaining. Skip one, and work a single crochet into the final chain.
Step 3: The Turning Point
This is where most beginners have trouble. To start your second row, chain two and turn your work. The first single crochet of this new row will go directly into the first chain-one space created by the row below.
Step 4: The Rhythm
Work a single crochet into that first chain-one space. Chain one, skip the single crochet stitch from the previous row, and work a single crochet into the next chain-one space. Continue this rhythm all the way across. You will end the row by working a single crochet into the space created by the turning chain of the row below.
Common Mistakes to Avoid
Even experienced crocheters can stumble on the moss stitch if they are rushing. Here is how to keep your work polished and professional.
The Edge Creep: If you do not count your stitches, you might find your work becoming slightly diagonal or wider than you intended. Pay very close attention to the very last stitch of each row. Make sure you are working into the “chain space” and not accidentally working into the side of the stitch.
The Tension Trap: Because you are alternating between the fabric of the single crochet and the open air of the chain loop, the fabric can look uneven if your single crochets are tight and your chains are loose. Take a moment to check your work every ten rows. If the chain spaces look like giant holes, you may need to tighten your chain stitch.
Confusing US and UK Terms: In the United States, we call this the “Single Crochet,” but in some international patterns, this same technique might be labeled “Double Crochet.” If you are reading a vintage or international pattern, always double-check the stitch abbreviations listed at the front to ensure you are starting with the correct height of stitch.
Pro Tips for a Better Result
To really take your moss stitch from “homemade” to “handmade-boutique,” consider these advanced finishing techniques:
- Blocking is Essential: The moss stitch has a memory. Once you finish your project, soak it in lukewarm water with a bit of wool wash, gently squeeze out the excess moisture, and pin it flat on a foam mat. This will open up the chain spaces and make the woven texture pop.
- Color Transitions: If you are working with multiple colors, the moss stitch is brilliant for blending. Because you are working into spaces, you can easily introduce a new color on the very first stitch of a row without bulky joins. This creates a soft, hand-dyed aesthetic.
- The Border: The moss stitch naturally creates a slightly jagged edge because of the chains. If you want a straight, clean edge for a blanket or a piece of wall art, add a simple border of one or two rounds of single crochet around the entire perimeter.
Variations and Personalization
The moss stitch is incredibly flexible. Once you feel comfortable with the basic row-by-row method, try these variations to keep your creativity flowing:
- The Two-Row Stripe: Use one color for two rows, then switch to another. This highlights the “offset” nature of the stitches and creates a classic, sophisticated look that is perfect for baby blankets.
- The Weighted Change: Try using a thinner yarn than the hook suggests. This creates a “lacey” version of the moss stitch that is airy and perfect for summer shawls or breezy scarves.
- The Modern Scarf: Instead of a rectangle, increase your stitches by one at the end of every other row to create a triangular, bias-cut scarf. The moss stitch looks gorgeous on the diagonal.
Care and Next Steps
The moss stitch is, fortunately, very resilient. Because it is a dense fabric, it holds its shape well over time. If you use a wool or blend yarn, always hand wash or use a delicate machine cycle with a mesh garment bag to prevent snagging. For cotton projects, you can usually be a bit more relaxed, but avoid high-heat dryers, which can shrink the fibers and distort the beautiful, even texture you worked so hard to create.
Now that you have mastered the rhythm, what is next? You might consider trying the “seed stitch” next, which is a cousin to the moss stitch, or perhaps experimenting with combining different weights of yarn in the same project. The moss stitch is the perfect foundation for color blocking, so don’t be afraid to experiment with your scraps!
FAQ
Does the moss stitch use a lot of yarn?
Because the moss stitch creates a relatively dense fabric, it generally uses a moderate amount of yarn—not as much as a complex cable pattern, but more than a simple double crochet stitch. It is very efficient for blankets, balancing speed with warmth.
Can I use this for a cardigan?
Absolutely! The moss stitch has a wonderful “drape.” Because it is not stiff, it mimics woven fabric beautifully, making it an excellent choice for a cozy, unstructured cardigan. Keep in mind that since it is a dense stitch, your garment will be quite warm.
Is the linen stitch the same as the moss stitch?
Yes, they are the same. “Linen stitch” is a common name because the woven appearance resembles linen fabric, while “moss stitch” or “granite stitch” refers to the textured, stone-like aesthetic. You will see these terms used interchangeably in patterns.
How do I fix a mistake in a previous row?
If you realize you missed a stitch, it is often easiest to “frog” (unravel) back to the error. Because the moss stitch construction is based on simple repeated loops, you won’t lose much progress. Simply rip back carefully, keep your hook in the loop, and redo the section.
Does this stitch work in the round?
Yes, it does! When working in the round, your sequence changes slightly. You essentially chain one and single crochet into the next chain space, skipping the single crochet below. Just be sure to join your rounds properly to avoid a spiral effect unless that is the look you are going for!
Conclusion
The moss stitch is one of those timeless techniques that truly never goes out of style. Whether you are using it for a bright, modern nursery blanket or a classic, neutral-toned cowl for yourself, the rhythm of the stitch will provide hours of peace and productivity. There is a deep, quiet satisfaction in watching the texture emerge row by row, knowing that each one is a step toward a finished piece that will last for years.
I hope this tutorial has helped you find your rhythm with the linen stitch. Remember, even the most experienced designers were once beginners who had to unpick their first few rows. Be patient with your tension, celebrate the slight variations that make your work uniquely yours, and most importantly, enjoy the time you spend with your yarn and hook. You are creating something beautiful, and that is a wonderful thing indeed. Happy stitching!