
Welcome to the World of Crochet
There is something truly magical about taking a single strand of yarn and a hook and transforming it into something beautiful, cozy, and entirely your own. If you have ever looked at a handmade scarf, a whimsical stuffed toy, or a delicate lace doily and wondered if you could ever create something like that yourself, I am here to tell you that you absolutely can. Crochet is more than just a hobby; it is a creative outlet that rewards patience, provides a sense of calm, and results in tangible treasures that wrap your loved ones in warmth.
If you are just starting your journey, the number of crochet stitches and techniques can feel a little overwhelming. You might be staring at your hook, wondering how on earth to hold it comfortably, or feeling confused by the way a pattern describes a “single crochet” versus a “double crochet.” Take a deep breath! Every master artisan you admire today started exactly where you are right now—fumbling with yarn tension and trying to figure out which loop goes where. This guide is designed to be your gentle companion, breaking down the fundamental stitches into clear, manageable steps so you can build a solid foundation with confidence. Whether you want to make heartfelt gifts for friends or create cozy decor for your home, mastering these basic stitches is your first step toward endless possibilities.
Understanding the Basics of Crochet Education
This guide is designed to take you from a complete beginner to someone who feels comfortable reading a pattern and executing the most common stitches. We will explore everything from the initial slip knot to the essential stitches that form the “alphabet” of crochet. You will learn not just the mechanics of the stitches, but also the importance of tension, how to keep your edges straight, and how to troubleshoot common issues that arise when you are just starting out.
This guide is for anyone who loves the idea of handmade living. If you are brand new to yarn crafts, this will serve as your go-to reference. If you have been crocheting for a while but feel like your stitches look a bit uneven or you have forgotten the subtle differences between taller stitches, you will find plenty of pro tips here to polish your technique. By the end of this article, you will have a clear, visual-friendly roadmap to understanding how crochet works, which will empower you to tackle your first real project with joy rather than frustration.
Essential Tools and Materials
Before we dive into the stitches, let’s talk about your “toolbox.” You do not need a fancy craft room or an expensive collection of supplies to start crocheting. In fact, keeping things simple is often better for learning.
- Crochet Hooks: Start with a medium-sized hook, such as a size H-8 (5.0 mm). This size is “goldilocks”—not too small to be fiddly, and not too big to be clunky. Metal or bamboo hooks are both excellent choices for beginners.
- Yarn: For your first few practice sessions, choose a medium-weight yarn (often labeled as “Worsted” or “Category 4”) in a light, solid color. Choosing a light color (like cream, yellow, or light blue) is crucial because it allows you to clearly see your stitches. Dark yarns, like black or navy, are notoriously difficult even for experienced crocheters because they hide the stitch definition.
- Stitch Markers: These little plastic clips are lifesavers. They help you keep track of where you started or ended a row, which is essential for maintaining even edges.
- A Tapestry Needle: You will need one of these with a dull tip to weave in your ends once you finish a row or a project.
- Scissors: Any pair of sharp household scissors will do the trick perfectly.
Key Crochet Terms and Stitches
Understanding the terminology is like learning a new language. While it may look like a jumble of letters at first, these abbreviations are simply shorthand to save space in written patterns.
- Slip Knot (sl knot): The starting loop on your hook.
- Chain (ch): The foundation for almost every flat crochet project.
- Single Crochet (sc): The shortest, most common stitch in U.S. terminology, perfect for dense, sturdy items.
- Half Double Crochet (hdc): A lovely middle-ground stitch that is taller than a single crochet but shorter than a double.
- Double Crochet (dc): A tall, flexible stitch that works up quickly and creates a beautiful, airy drape.
- Slip Stitch (sl st): Used for joining rounds or moving your yarn across a row without creating height.
- Fasten Off: The act of cutting the yarn and pulling the tail through the final loop to secure your work.
Helpful Notes Before You Start
Your “tension” is the most important concept to master. Tension refers to how tightly or loosely you hold your yarn as you work. If you pull too tightly, the fabric will be stiff and it will be difficult to insert your hook into the stitches. If you are too loose, the fabric will look holey and uneven. The secret? Aim for consistency, not perfection. Practice holding the yarn in a way that feels comfortable for you—there is no “right” way to hold your yarn, as long as the tension remains steady. Also, remember to count! Beginners often accidentally add or drop stitches at the edges of their rows, which causes the piece to expand or shrink into a triangle rather than a square.
The Foundations of Your Crochet Journey
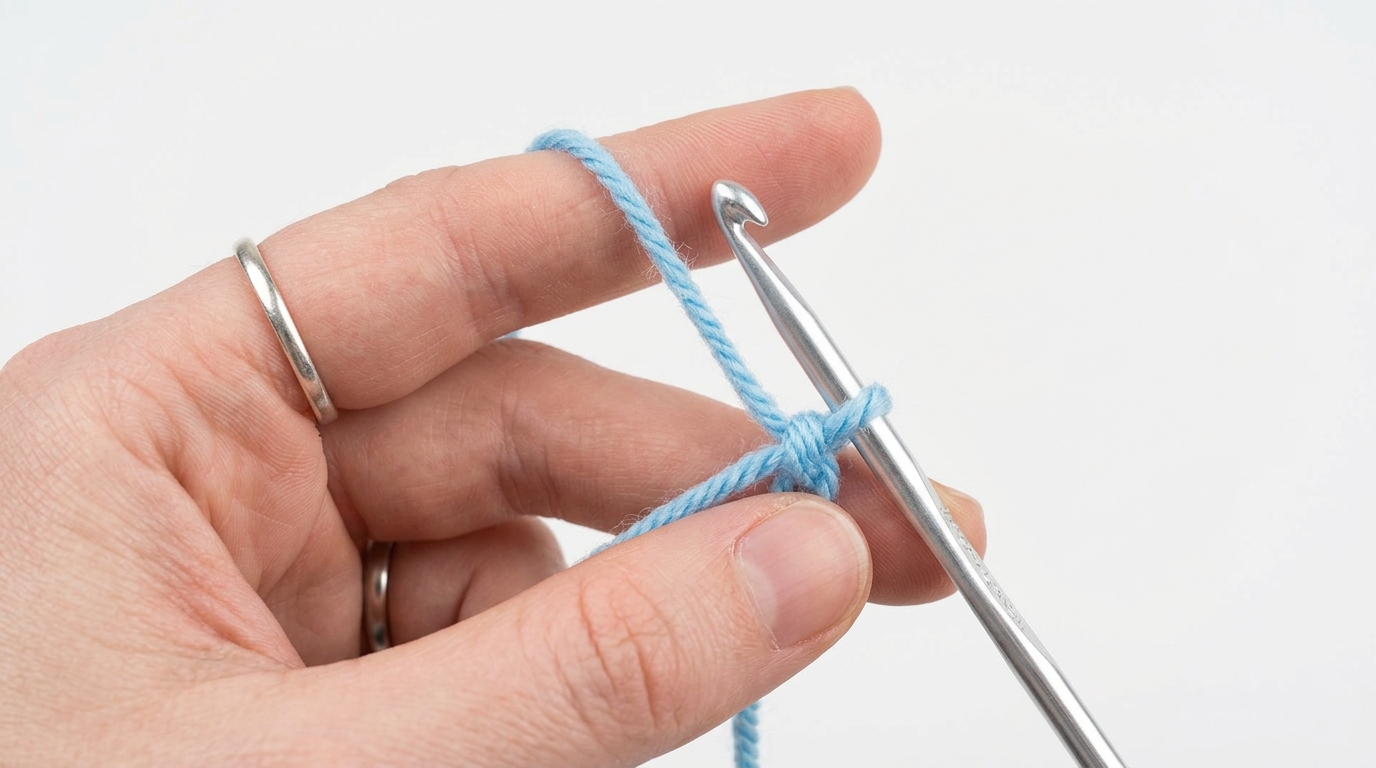
Great crochet begins with your posture and your grip. Sit somewhere comfortable with good lighting. Hold the hook in your dominant hand, just like you would a pencil or a knife—whichever feels natural to you. With your other hand, control the yarn. Many crocheters drape the working yarn over their index finger to help guide it into the stitches.
The Slip Knot
Start by making a loop with your yarn, leaving a short tail. Reach through the loop and pull up a segment of the yarn attached to the ball. Pull gently on both ends to tighten the knot onto your hook. Don’t make it too tight; it should slide easily along the hook’s shaft.
The Foundation Chain
Holding the hook in your right hand, use your left hand to guide the yarn over the hook from back to front (this is called “yarn over”). Use the hook to pull that yarn through the loop already on your hook. You have just made your first chain! Repeat this until you have a string of ten or twenty chains. This creates the “spine” of your project.
The Single Crochet
Insert your hook into the second chain from your hook. Yarn over and pull up a loop. You now have two loops on your hook. Yarn over again and pull through both loops on the hook. That is one single crochet. To start a new row, chain one, turn your work, and insert your hook under both loops of the stitch from the row below.
The Half Double Crochet
Yarn over before you insert your hook into the stitch. Insert your hook, yarn over, and pull up a loop (you now have three loops on the hook). Yarn over once more and pull through all three loops at once. This creates a slightly taller, softer fabric than the single crochet.
The Double Crochet
Yarn over, insert the hook, and pull up a loop (three loops on the hook). Yarn over and pull through the first two loops. Yarn over again and pull through the final two loops. This is a powerful stitch that builds height very quickly.
Step-by-Step Learning Guide
To really learn these stitches, I recommend a simple “sampler” exercise. Don’t worry about making a fancy item yet. Instead, follow these steps:
- Start by chaining 15 stitches.
- Work 5 rows of single crochet. Work all the way into the end of the chain, chain 1, turn, and go back. Use stitch markers to mark the first and last stitch of each row so you don’t lose track of your count.
- Once you complete 5 rows, transition to 5 rows of half double crochet. Pay attention to how the stitch feels different on your hook.
- Finish with 5 rows of double crochet. This will give you a beautiful, textured piece that shows the difference in height and density between these three core stitches.
Watching your work grow, even if it is just a simple swatch, is incredibly satisfying. When you make a mistake—and you will—don’t be afraid to “frog” it. That’s a common crochet term for pulling out your stitches (rip it, rip it!) to fix an error. It is a natural part of the learning process.
Common Mistakes to Avoid
Even the most talented crocheters have to correct their work from time to time. Here are the traps that beginners often fall into:
- The Twisted Chain: When starting your foundation chain, it is easy to accidentally twist it before joining or working rows. Lay it flat on a table to ensure it is straight before you begin your first row.
- The “Invisible” Last Stitch: In rows of single crochet, beginners often miss the very last stitch of the row, leading to a diagonal, narrowing edge. Keep your work consistent by physically placing a stitch marker in the last stitch of every row.
- Hook Size Mismatch: If your project looks like lace when it should look like a solid blanket, your hook might be too large for your yarn. Check the yarn label for the recommended hook size.
- Tension Fatigue: If your hand starts to cramp, you are likely gripping the hook too tightly. Set the project down, stretch your fingers, and try to consciously relax your hands.
Pro Tips for Polished Results
If you want your projects to look more “professional,” focus on the finishing touches. When you finish a row, don’t leave long, messy tails hanging at the edges. Use your tapestry needle to “weave in” your ends. To do this properly, thread the tail through the needle and stitch it back and forth through the back of your existing crochet stitches, securing it firmly. If you weave in ends as you go, you won’t have a daunting task at the end of your project.
Another tip is to practice consistent gauge. Gauge is the number of stitches and rows that fit into a standard measurement (like a four-inch square). While you don’t always need to hit a perfect gauge for scarves, it becomes very important for items that need to fit, like hats or sweaters. Simply practice by making a four-inch square from time to time to see if your stitch count matches your desired tension.
Personalization and Growth
Once you have mastered the basic stitches, the world is your oyster. You can combine these stitches to create new textures. For example, alternating a single crochet and a double crochet in the same row creates a bumpy, beautiful fabric known as the “Griddle Stitch” or “Lemon Peel Stitch.”
Change is good! If a pattern calls for a neutral color but your heart desires a sunset orange or a deep forest green, go for it. Because you are the creator, every choice you make adds a piece of your personality to the work. When you choose your colors, think about where the project will live. Is it for a nursery, a sun-drenched living room, or a chilly winter commute? The yarn you choose and the colors you combine will change the entire energy of the piece.
Care and Next Steps
Once you finish your practice pieces, treat them with care! Hand-washing in cool water with a gentle wool-safe wash is the best way to keep your crochet items looking new. Lay them flat on a towel to dry; never hang wet, heavy crochet items, as the weight of the water can stretch them out of shape.
As for what to do next? Look for a simple, beginner-friendly pattern, such as a basic dishcloth, a simple scarf, or a classic granny square. Now that you understand the basic stitches, you have the fundamental tools to read almost any pattern. Start with small, quick-win projects to build your confidence and muscle memory.
FAQ
How do I know if I am holding the yarn correctly?
There is no single correct way! As long as your yarn flows smoothly without tangling and your tension remains relatively even, your method is the right one for you. Experiment with different holds until you find what doesn’t make your hands tired.
Why does my square look more like a triangle?
This is caused by missed stitches. You are likely dropping a stitch at the beginning or end of your rows. Always count your stitches at the end of every row to ensure you have the same number you started with.
What is the easiest project for a beginner?
A scarf is the classic starter project because it requires only a rectangle of even stitches. It teaches you how to maintain tension over a long period without having to worry about complex shaping or counting complex patterns.
How do I read a crochet pattern?
Patterns are written as a series of instructions. Look for the “Abbreviations” section at the start of a pattern, and then look for the rows. If it says “ch 20, sc in 2nd ch from hook,” simply follow those steps in order. Take it one sentence at a time!
Should I be worried about my gauge?
Don’t stress about gauge as a beginner. Focus on creating fabric that you like the feel of—not too loose, not too tight. You can worry about exact, professional-grade gauge once you are ready to make clothing or items that require a specific fit.
Conclusion
I hope this guide has helped clear the air and provided you with a sense of excitement for your crochet journey. There is something profoundly special about the rhythm of the hook, the texture of the yarn against your fingers, and the quiet satisfaction of seeing a project grow row by row. Crochet is a skill you have for life, a gentle companion for rainy afternoons, and a beautiful way to share your love with friends and family through handmade gifts.
Remember, there is no deadline in yarn craft. Whether you finish your first swatch in an afternoon or a week, the process is what matters most. Embrace your mistakes, celebrate your progress, and most importantly, have fun with every stitch. You are now part of a beautiful community of makers, and I cannot wait to see what you create next. Keep your hook handy, keep your tension loose, and let your creativity grow one loop at a time.