
Introduction
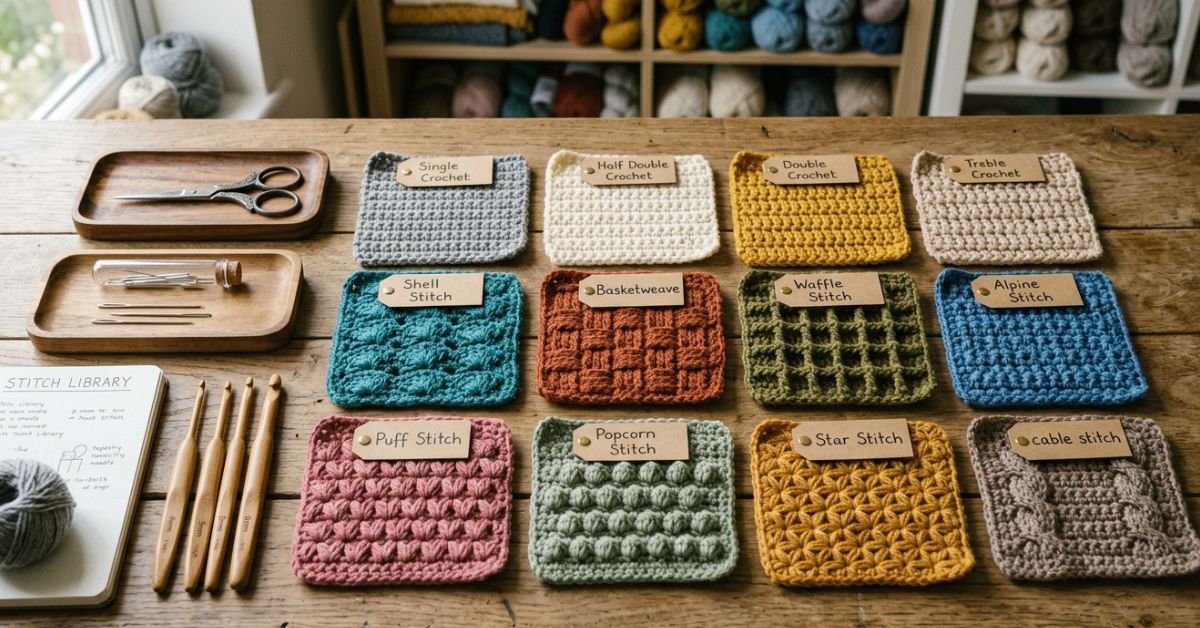
There is something truly magical about the rhythm of a crochet hook dancing through yarn. Whether you are picking up a hook for the very first time or you have spent years filling your home with handmade blankets and accessories, the foundation of every beautiful piece lies in the stitches you choose. Mastering new textures and standard techniques is the key to evolving from a crafter who simply follows instructions to an artisan who understands how to shape, drape, and elevate every project.
In this guide, we are exploring the essential stitches and textures that every crocheter should have in their toolkit. By learning how to manipulate simple loops and yarn-overs, you gain the power to turn a basic scarf into a boutique-style accessory or a standard washcloth into a piece of intricate home decor. We will walk through the core techniques that define U.S. crochet and look at how textured patterns can breathe life into your work. This article is designed to be your cozy companion, providing the clarity and reassurance you need to experiment with confidence. Grab your favorite hook, a soft skein of yarn, and let’s grow your crochet skills together.
Quick Overview
This guide is designed for both beginners who are eager to expand their repertoire and intermediate makers looking to refine their technique. You will learn:
- The standard U.S. crochet stitches that serve as the foundation for almost every pattern.
- How to combine these stitches to create meaningful texture.
- Practical tips for improving your tension and professionalizing your finished edges.
- The essential terminology you need to transition from simple rows to more complex, textured designs.
- Guidance on choosing the right yarn and hook combinations to make these stitches shine.
Essential Stitches and Concepts
Before we dive into the texture, it is important to ensure we are speaking the same language. U.S. crochet terminology is the standard for most patterns you will find online and in craft books. Understanding these abbreviations is your first step toward total project freedom.
- ch (chain): The standard starting point for most projects.
- sc (single crochet): A short, sturdy stitch perfect for tight fabric, amigurumi, and structural items.
- hdc (half double crochet): The “bridge” stitch, taller than a single crochet but shorter than a double, allowing for a lovely, fluid drape.
- dc (double crochet): The workhorse of crochet; it is fast, flexible, and creates an airy, soft fabric.
- sl st (slip stitch): Used primarily to join rounds, create smooth edges, or move your yarn across a row without adding height.
- st/sts (stitch/stitches): The individual loops you work into.
- Gauge: The number of stitches and rows that fit into a standard measurement (usually 4 inches). This is crucial for projects where size matters, like clothing.
Helpful Notes Before You Start
Crochet is as much about relaxation as it is about creation, but a few technical habits can make a world of difference.
- The Importance of Tension: If your stitches feel too tight, you may need a larger hook; if they look loose or gappy, try a smaller one. Your tension reflects your mood, so if you’re feeling stressed, try to take a breather before picking up your hooks.
- Count Your Stitches: It might be the least favorite part of the process, but counting your stitches at the end of every row prevents the dreaded “trapezoid effect” where your edges accidentally grow or shrink.
- Yarn Weight Matters: When learning a new textured stitch, choose a light or medium-colored, smooth worsted-weight yarn. Dark colors or “fuzzy” novelty yarns make it very difficult to see where your hook should go, which can lead to unnecessary frustration.
- Markers are Your Friend: Keep a handful of stitch markers nearby. Use them to mark the first and last stitch of every row to keep your edges straight.
Mastering Textured Foundations
Texture is what makes a crochet project feel luxurious. By varying where you insert your hook, you can create ripples, cables, and ridges without needing to learn an entirely new set of complex stitches.
Working in the Back Loops
In standard crochet, we generally work under both loops of the “V” shape on top of the stitch. However, if you insert your hook only into the back loop (BLO), you create a beautiful horizontal ridge. This technique is often used in ribbed cuffs for sweaters or the brim of a hat. It is a simple shift that completely changes the appearance of the fabric.
The Beauty of Front Post Stitches
Front post stitches are the secret to creating “cables” and raised, braided textures. Instead of working into the top loops, you wrap your hook around the vertical post of the stitch from the row below. This pushes the stitch forward, creating depth and a three-dimensional effect. While it can feel awkward the first few times you try it, your fingers will quickly gain the muscle memory needed to create stunning, professional-looking designs.
Combining Stitches for Impact
The most effective textures often come from alternating heights. For example, a “Moss Stitch” (alternating single crochet and chains) creates a woven look that is incredibly soft and stretchy. A “Griddle Stitch” (alternating single crochet and double crochet) creates a dense, sturdy fabric that is perfect for home decor like coasters or thick, warm dishcloths.
Step-by-Step for Textured Success
To begin your journey into texture, follow this learning progression. Do not feel like you need to master everything in one sitting.
- Start with the swatch: Never jump straight into a full blanket. Create a 6-inch by 6-inch square using a simple stitch, like the double crochet. Once you are comfortable, try the same square using the back loop only. You will immediately see the difference in how the fabric behaves.
- Practice the transition: Work a few rows of single crochet, then switch to a row of double crochet. Observe how the change in height impacts the drape of your yarn. This is the foundation of designing your own projects.
- Introduce the Post: Practice the front post double crochet on a plain double crochet base. Don’t worry about the pattern; just focus on getting your hook under that post and pulling the yarn through.
Common Mistakes to Avoid
Even experienced crocheters run into these frequent hiccups. Keep these in mind to keep your workflow smooth:
- Skipping the Turning Chain: Beginners often forget their turning chain, which causes the edges of their project to pull inward. Always count your chains and ensure you know whether your pattern considers the turning chain a “stitch” or just a spacer.
- The Twisted Chain: When working your foundation chain, make sure it isn’t twisted before you join the ends to start working in the round. If you join a twisted chain, your entire project will be stuck in a permanent spiral.
- Ignoring Gauge: If you are making a garment, never skip the gauge swatch. Your personal tension might be tighter or looser than the pattern designer’s. Checking your gauge ensures that your sweater will actually fit when you’re done.
- Misplacing the Final Stitch: The last stitch of a row often hides deep in the corner. If you are struggling to find it, look for the little “v” shape at the very end of the row and place a stitch marker there as soon as you finish it.
Pro Tips for a Better Result
The difference between a “homemade” project and a “handmade” heirloom is often found in the finishing work.
- Blocking is Non-Negotiable: Once you finish a project, it may look a little uneven. Blocking—the act of wetting or steaming your piece and pinning it into the correct shape—will smooth out your stitches and give your project a professional, polished finish.
- Weave in Ends Securely: Do not just snip your yarn at the end of a color change. Weave your ends back and forth through the stitches in multiple directions. This prevents your hard work from accidentally unraveling over time.
- Keep Your Tools Organized: A cluttered space leads to a cluttered mind. Use a dedicated bag or bin for your current project, hook, and yarn. It keeps your tension consistent by keeping your project clean and free of snags.
Variations and Personalization
Once you are comfortable with these stitches, the world is your oyster.
- Change the Yarn Weight: Use a chunky, velvet-style yarn for these textured patterns to create a cozy, weighted throw blanket. Switch to a fine lace-weight yarn and a smaller hook to create delicate, lacy scarves that are perfect for transition seasons like spring.
- Play with Color: Textured stitches look incredible when worked in variegated or hand-dyed yarns, as the depth of the stitches catches the light and highlights the color transitions.
- Combine Textures: For a truly custom project, alternate sections of flat, smooth stitches with sections of raised, post-stitch textures to create a patchwork effect.
Care and Storage
Handmade crochet items are an investment of your time and love, so treat them with care.
- Washing: Always check the yarn label. Most acrylics can go in the washing machine on a gentle cycle, but wools often require a delicate hand wash. Use a mild wool-safe detergent and never wring your piece out, as this can stretch the fibers.
- Drying: Dry your crochet flat on a towel. Hanging a heavy wet blanket can cause it to lose its shape and stretch indefinitely.
- Storage: Keep your pieces folded in a cool, dry place. If you are storing wool during the warmer months, consider using a breathable storage bag or a cedar chest to protect your beautiful work from moths.
FAQ
How do I know which hook size to use?
Every skein of yarn has a label that includes a recommended hook size. This is a great starting point for beginners. If your crochet feels too loose and see-through, try going down a hook size. If it feels stiff like cardboard, try going up a size.
What is the easiest way to count stitches in a row?
The best way is to use stitch markers every 10 or 20 stitches. This saves you from having to recount the entire row if you get distracted halfway through.
Can I mix different yarn brands in one project?
You absolutely can, but ensure the yarn weights (the thickness) are the same. If you mix a thick, chunky yarn with a thin, fine yarn, the project will pull and pucker.
Why do my edges look wavy?
This usually happens because the tension is inconsistent or you are accidentally adding extra stitches at the end of your rows (a common mistake called “increasing”). Always check your stitch count at the end of every row.
Is it necessary to learn how to read a written pattern?
While you can learn a lot from watching videos, learning to read patterns opens up thousands of opportunities. It also helps you troubleshoot your own progress if you get stuck. Think of it as learning a new, creative language.
Conclusion
Embarking on the journey of crochet is one of the most rewarding creative outlets you can choose. By taking the time to understand these standard stitches and exploring the world of texture, you are building a foundation that will serve you for years to come. Remember, every master began their journey with a single chain and a bit of uncertainty. Don’t be afraid to make mistakes—they are simply proof that you are learning and growing.
There is no “right” way to be a crocheter; whether you are making a quick gift for a friend, a cozy blanket for your living room, or simply enjoying the meditative calm of working with yarn, you are part of a long, beautiful tradition of craftsmanship. Keep experimenting, keep your markers handy, and most importantly, enjoy every single loop. Your next favorite project is only a few stitches away.