
Introduction
There is something truly magical about the way a simple length of yarn can transform into a plush, dimensional masterpiece with just a few rhythmic movements of your hook. If you have been looking for a way to add that professional, high-end “wow” factor to your crochet work, the puff stitch is about to become your absolute favorite technique. Unlike flat stitches that simply lay across your fabric, the puff stitch creates a lovely, rounded protrusion that adds incredible texture, warmth, and depth to any project.
Whether you are crafting a cozy baby blanket, a chunky winter scarf, or an intricate decorative throw pillow, learning to master this stitch will open up a world of creative possibilities. At first glance, a puff stitch might look a bit intimidating, but I promise you, it is much easier than it appears! It is essentially just a series of loops pulled up through a single stitch and then closed together. By following this guide, you will find that it becomes second nature in no time. We are going to walk through the mechanics of this stitch together, ensuring you feel confident, comfortable, and inspired to start creating pieces that you’ll be proud to show off. Let’s sit down with a nice cup of coffee, pick up our hooks, and bring some beautiful texture to life.
Quick Overview
This guide is designed for both absolute beginners who are ready to learn their first specialty stitch and intermediate crocheters looking to refine their technique. You will learn the anatomy of a perfect puff stitch, how to troubleshoot common tension issues, and how to incorporate this stitch into your work for the best decorative results. Mastering the puff stitch is a milestone in your crochet journey; it bridges the gap between basic stitches and complex, textured patterns. It is an ideal skill for those who love making tactile accessories or adding unique, soft details to home decor pieces.
Tools You Will Need
One of the greatest joys of crochet is how few tools you really need to get started. To practice the puff stitch, you don’t need any special equipment.
- Your Favorite Hook: I recommend using a medium-sized hook, such as a 5.0mm (H/8) or 5.5mm (I/9) hook, as these sizes make it much easier to manage the multiple loops required for this stitch.
- Worsted Weight Yarn: Ideally, choose a smooth, light-colored acrylic or wool blend. Light colors make it significantly easier to see exactly where you are inserting your hook and pulling up your loops.
- Stitch Markers: These are your best friends. They help you keep track of your starting and ending points, especially when you are working on a repeating pattern.
- A Tapestry Needle: Essential for weaving in those ends securely once you have finished your beautiful, puffy projects.
Understanding the Anatomy of a Puff Stitch
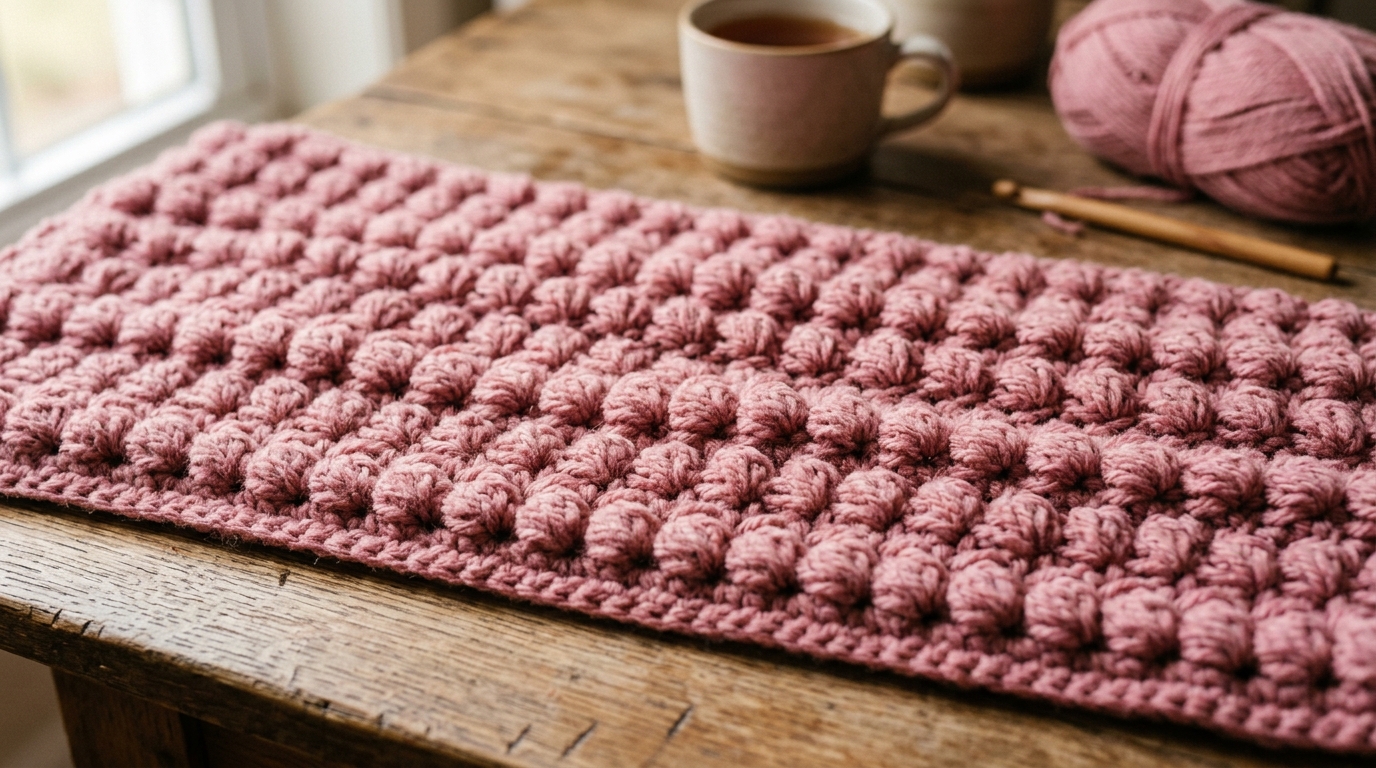
Before we jump into the technical steps, let’s visualize what makes a puff stitch, well… a puff! Unlike a double crochet, where you create a single loop and work it off, a puff stitch is created by pulling up multiple, partial loops in the same stitch space to create a “bunch.” When you yarn over and pull through all of those loops at once, they bunch together to form a soft, rounded shape that stands out from the rest of your fabric. This is why it’s often used in designs where you want to emphasize texture, such as in flowers or cozy, thick fabric textures.
Helpful Notes Before You Start
Puff stitches are all about tension. If you crochet too tightly, pulling up those multiple loops will feel like a struggle. If your tension is too loose, your puff stitches might look a bit uneven or saggy. Here is a secret: don’t be afraid to pull those loops up a little higher than you think you need to. Stretching them out makes the final stitch look much fuller and more professional. Also, remember that puff stitches are usually worked into a base of single crochet, half double crochet, or double crochet. In many patterns, a puff stitch counts as a single stitch, so keep a close eye on your stitch counts for each row!
Mastering the Puff Stitch Step-by-Step
Let’s go through the steps of creating this beautiful stitch. You can practice this on a simple chain foundation with a row of single crochets.
- Step 1: Yarn over your hook and insert it into the next stitch.
- Step 2: Yarn over and pull up a long loop. You should now have three loops on your hook.
- Step 3: Yarn over and insert your hook back into the same stitch.
- Step 4: Yarn over and pull up another long loop. Now you should have five loops on your hook.
- Step 5: Repeat this process (yarn over, insert, pull up a loop) until you have the desired number of loops on your hook—typically 7 or 9 loops for a standard puff stitch.
- Step 6: Finally, yarn over one more time and draw your yarn through every single loop on the hook.
- Step 7: Chain one to “lock” or secure the puff stitch in place.
How to Apply the Puff Stitch in Projects
Now that you know how to make the stitch, you might be wondering how to use it. Beginners often start by incorporating single puff stitches into a pattern, such as alternating them with single crochet stitches to create a subtle, polka-dot-like texture. As you grow more comfortable, you can cluster them together to create bobbles or elaborate patterns. They look absolutely stunning on blankets, where the texture provides that “cozy” feeling that makes handmade items feel so special. They are also wonderful for the centers of crochet flowers or as a decorative border on a simple scarf. The sky is really the limit once you get the technique down!
Common Mistakes to Avoid
Even experienced crocheters run into trouble with the puff stitch from time to time. Here are a few things to watch out for:
- The “Squished” Puff: This usually happens when you don’t pull your loops up high enough. Make sure each time you pull up a loop, you extend it to the height of your current row’s stitches.
- Counting Errors: Because a puff stitch is slightly wider than a single crochet, it’s easy to skip the stitch immediately following the puff. Always count your stitches at the end of each row to ensure you haven’t accidentally decreased.
- Hook Snagging: When you reach the final “pull through all loops” step, if you find your hook snagging, try tilting the head of your hook downward to help it glide through the loops more smoothly.
- Tightening the Locking Chain: Sometimes, in our excitement to finish the stitch, we pull the locking chain too tight, which can make the next row difficult to work into. Keep that final chain nice and relaxed!
Pro Tips for a Better Result
The difference between a “good” puff stitch and a “spectacular” one comes down to a few expert touches.
- Blocking is Your Best Friend: Because the puff stitch creates organic texture, it can sometimes pull on your fabric. Blocking your finished, damp piece by gently pinning it into shape will “set” the stitches and make those lovely puffs pop exactly the way they are supposed to.
- Check Your Gauge: If you are working on a project that needs to be a specific size, remember that puff stitches are yarn-hungry! They use more yarn than standard stitches, so always buy an extra skein just in case.
- Practice with Different Weights: Try practicing the puff stitch with a bulky weight yarn, then a cotton thread. You will see how the personality of the stitch changes entirely with the yarn weight, which is a great lesson in design.
Variations and Personalization Ideas
You can customize your puff stitch projects in so many ways. Try working your puff stitches in a contrasting color to create a playful pattern against a neutral background. You can also vary the number of loops; a 5-loop puff is delicate and subtle, while an 11-loop puff is bold and prominent. For home decor, using a slightly larger hook than recommended for your yarn can create a wonderfully airy, dramatic look, while a smaller hook creates a dense, sturdy texture perfect for a pot holder or a structural basket.
Care and Next Steps
Once your project is complete, give it the love it deserves! Most puff stitch items are best hand-washed in cool water with a gentle wool wash. Never wring out your items; instead, roll them in a clean towel to absorb excess water, then lay the item flat to dry in its original shape.
Your next step should be practice. Try making a small swatch where you experiment with different placements of the puff stitch. Create a “texture library” by making squares of different stitch combinations. This builds muscle memory and gives you a collection of samples you can refer back to whenever you start a new, larger design. Keep experimenting—you are doing great!
FAQ
How many loops should be on my hook for a standard puff stitch?
A standard puff stitch typically uses 7 loops on the hook (created by yarning over and pulling up a loop 3 times, plus the original starting loop). However, you can use 5 or 9 if you want a smaller or larger puff.
Why does my puff stitch project look wavy or distorted?
This is usually caused by tension issues or the extra bulk of the puff stitches. Blocking your finished project will usually smooth this right out. If the distortion is extreme, try going up a half-size in your hook, which will give the fabric more room to breathe.
Can I use the puff stitch in a project worked in the round?
Absolutely! The puff stitch looks beautiful in rounds—like in hats or bags. Just remember that if you are working in a continuous spiral, you may need a stitch marker to keep track of your rounds so you don’t lose where you started and ended.
Is the puff stitch the same as a bobble stitch?
While they look similar, they are different. A bobble stitch is usually made of several double stitches worked partially and then closed, which creates a more structural, stiff “ball.” A puff stitch is softer and more rounded because it is created by simply pulling up loops in one go.
Why is my yarn splitting when I pull through all the loops?
This often happens with yarn that has a loose ply. Try using a crochet hook with a more tapered head, which helps to gather the loops together without snagging the individual strands of the yarn.
Conclusion
I hope this guide has helped clear up the mystery of the puff stitch for you. There is a deep, quiet satisfaction in watching these beautiful, textural motifs emerge from your hook one by one. Remember, crochet isn’t just about the finished product; it’s about the meditative, creative time you spend with your yarn. Don’t worry if your first few puffs look a little bit “unique”—every artisan starts exactly where you are. Keep practicing, keep playing with color, and above all, keep enjoying the process of making something lovely with your own two hands. You have all the skills you need to create amazing, textured projects that will bring warmth and beauty into your home. Happy stitching!