
Introduction
Walking into a craft store and seeing shelves overflowing with beautiful, squishy yarn is one of the most exciting experiences for a maker. But if you have ever picked up a hook and felt intimidated by the abbreviations in a pattern, please know that you are not alone. There is a special kind of magic that happens when you turn a simple strand of fiber into a piece of handmade art, and the foundation of that magic lies in just a few essential stitches.
Whether you are a newcomer to the craft, eager to make your first blanket, or an intermediate crocheter looking to refine your technique for more precise edges and consistent tension, mastering the “big three”—single, double, and treble crochet—is the absolute best place to start. These stitches are the building blocks of almost every project you will ever encounter, from delicate baby booties to cozy, oversized sweaters. My goal in this guide is to demystify these stitches, remove the stress, and help you find that rhythmic, meditative flow that makes crochet so deeply rewarding. We are going to break these down into simple, manageable steps, focusing on the mechanics so you can feel confident in every loop you pull through. Let’s grab your favorite hook, find a bright, smooth yarn, and get ready to create something beautiful, one stitch at a time.
Quick Overview
This guide is designed for both absolute beginners and those wishing to polish their foundational skills. We will cover the mechanics of the three most popular stitches in U.S. crochet: the single, the double, and the treble. You will learn:
- The proper way to hold your hook and yarn for consistent tension.
- The exact “anatomy” of each stitch—where to insert your hook and how to yarn over.
- How to transition between stitches to build height in your work.
- Common hurdles like counting stitches and adjusting your turning chains.
- Why these specific stitches form the “DNA” of almost all crochet patterns.
This guide is meant to be a resource you can return to whenever you feel stuck or simply need a quick refresher. By the end of this journey, you will no longer see a maze of abbreviations; you will see a language that you speak fluently.
Tools to Get Started
You do not need a fancy craft room filled with expensive tools to master these stitches. Keep it simple so you can focus entirely on your hands and the yarn.
- A “User-Friendly” Yarn: Avoid dark colors, fuzzy mohair, or glittery novelty yarns for your first practice sessions. Choose a light-colored, worsted weight (Category 4) acrylic or cotton blend yarn. Light colors make it much easier to see the “V” shapes of your stitches, which is vital for learning where your hook goes.
- The Right Hook: For a standard worsted weight yarn, a size H/8 (5.0 mm) hook is the gold standard. It is large enough to handle easily but small enough to keep your stitches neat.
- Stitch Markers: These are your best friends. Even if you are just practicing, having a few locking stitch markers will help you identify the first and last stitch of a row, which is where most beginners accidentally increase or decrease their stitch count.
- A Tapestry Needle: You will need this later for weaving in your ends, which is how you give your work that professional, polished finish.
Understanding the Basics: Tension and Chains
Before we dive into the stitches, we have to talk about the “foundation.” Crochet is a craft of tension. If you hold the yarn too tightly, your work will be stiff and your hook will struggle to dive into the stitches. If you hold it too loosely, the project will look gappy and uneven.
Find a grip that feels natural to you—whether you hold your hook like a pencil or a knife. The most important thing is that the yarn flows smoothly through your non-dominant hand. Practice creating a foundation chain of 20 stitches. If the chain looks like a messy knot, loosen your grip. If it looks like a beautiful, uniform braid, you are ready to move on.
The Single Crochet (sc)
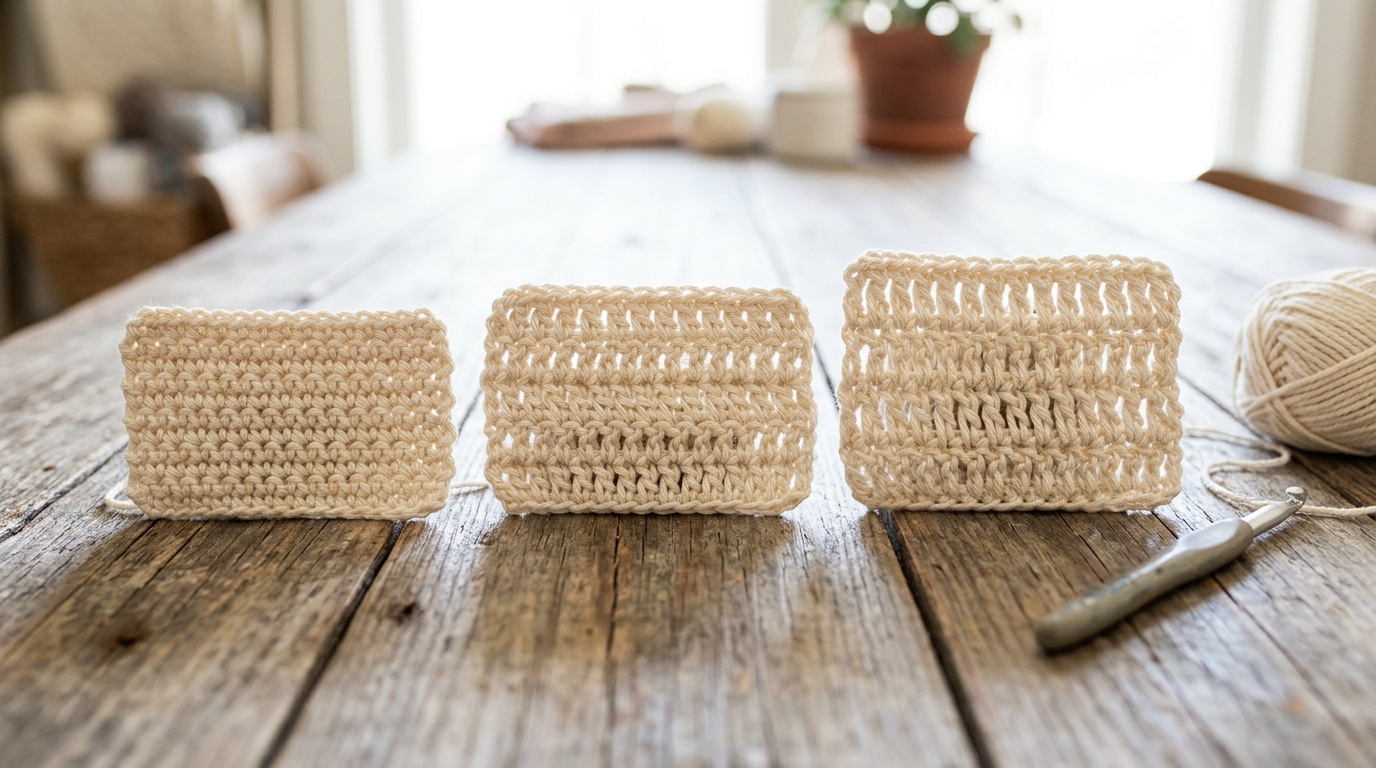
The single crochet is the shortest of the three, creating a dense, firm fabric that is perfect for amigurumi or warm, thick scarves.
How to Master the Single Crochet
- Insert: Push your hook into the second chain from the hook (or the designated stitch of the previous row).
- Yarn Over (YO): Wrap the yarn over your hook from back to front.
- Pull Through: Draw the yarn through the stitch. You should now have two loops on your hook.
- Finish: Yarn over again, and pull the yarn through both loops on the hook.
Why Your Tension Matters Here
Because single crochet is so dense, it is easy to accidentally make your stitches very tight. If you find your wrist hurting or your hook struggling to enter the hole, take a deep breath, consciously relax your shoulders, and try to pull your loops up just a tiny bit higher before finishing the stitch.
The Double Crochet (dc)
The double crochet is essentially the “workhorse” of the crochet world. It is taller and faster to work up than the single crochet, and it creates a lovely drape that is perfect for garments and blankets.
The Step-by-Step Double Crochet
- YO and Insert: Yarn over first, then insert your hook into the stitch.
- Pull Through: Yarn over again and pull through. You now have three loops on the hook.
- The First Pair: Yarn over and pull through the first two loops only. You will have two loops remaining on the hook.
- The Second Pair: Yarn over one more time and pull through the final two loops.
The “Turning Chain” Concept
When working in rows, you will notice that the “chain” at the start of the row acts as your first stitch. For a double crochet, you usually chain 3 to begin the row. This chain takes the place of that first double crochet, which can be tricky for beginners to identify later. Using a stitch marker to mark the top of your chain 3 will save you from wondering where to place your final stitch on your way back!
The Treble Crochet (tr)
The treble stitch is tall, airy, and elegant. It works up very quickly, making it a fantastic choice for market bags, lacy shawls, or summer cardigans.
How to Execute the Treble Crochet
- Double YO: This time, wrap your yarn over the hook twice before inserting it into the stitch.
- Pull Through: Yarn over and pull through. You now have four loops on your hook.
- Three-Step Finish: Yarn over and pull through the first two loops (three left on hook). Yarn over and pull through the next two loops (two left on hook). Yarn over and pull through the final two.
It feels like a rhythm: over, over, under, pull. Once your hands get used to the extra movement of the double yarn-over, you will be flying through your projects.
Common Mistakes to Avoid
Even experienced crafters make mistakes, especially when tired or distracted. Avoiding these will make your crochet experience much smoother.
- The Disappearing Stitch: The most common beginner error is missing the very last stitch of a row. This causes your rectangular piece to unintentionally become a triangle. I recommend counting your stitches at the end of every single row. If you started with 20 stitches, end with 20!
- The “Twisted” Chain: When you join in the round for the first time, make sure your foundation chain is laying flat. If it is twisted, your entire project will be stuck with a permanent, annoying spiral.
- Forgetting the Turning Chain: Beginners often forget that the chain at the start of a row counts as a stitch. This is why projects often start to “shrink” on the sides. Always verify whether your pattern counts the turning chain as a stitch.
- Hook Size Mismatch: If your project looks like lace when it should look like a solid fabric, your hook is likely too large for your yarn weight. Don’t be afraid to switch tools until you find that perfect fit.
Pro Tips for a Polished Professional Finish
If you want your projects to look like they came from a high-end boutique rather than a craft room, follow these “insider” tips.
- Mind Your Edges: When inserting your hook at the beginning or end of a row, try to go under both loops of the “V” shape at the top of the stitch. Only grabbing the back loop will create a ridge, which is a design choice, but it can make your edges look wobbly if you aren’t doing it intentionally.
- Blocking is Magic: Once you finish a project, even a simple swatch, wash it gently and lay it out to dry in the shape you want. This process, called “blocking,” relaxes the fibers and makes your stitches look uniform and clean. It is the secret difference between a “handmade” look and a “hand-crafted” look.
- Weaving Ends Securely: Don’t just snip your yarn end off close to the knot. Thread it onto a tapestry needle and weave it back and forth through the stitches, then back again. This ensures your project won’t unravel in the wash.
Personalization Ideas for Any Project
Once you master these three stitches, you can start combining them to create endless textures.
- The Shell Stitch: Use a combination of double crochets in the same stitch to create a shell-like texture that is beautiful for borders.
- V-Stitch: By working a double crochet, a chain, and another double crochet into the same space, you create a light, open “V” pattern that is perfect for summer shirts and wraps.
- Color Transitions: Switching your yarn color every two rows is an effortless way to make a simple blanket look like a complex, well-thought-out design. Don’t be afraid to experiment with bold color contrasts.
Next Steps for Your Journey
The best way to solidify these skills is to make a “Sampler Scarf.” Choose one row of single crochet, one row of double crochet, and one row of treble crochet. Repeat that sequence until you have a long piece. It is a wonderful way to see your progress and practice how the different stitch heights work together side-by-side. As you improve, you might want to try “Half Double Crochet” (the missing link between single and double) or learn how to transition between different yarn weights. Remember, there is no rush. Crochet is a lifelong skill, and every stitch you make today makes you a better maker for tomorrow.
FAQ
How do I stop my crochet from getting smaller at the ends?
This usually happens because you are missing the first or last stitch of the row. Use a stitch marker in the first stitch of every row so you know exactly where to insert your hook when you return.
Why are my edges wavy instead of straight?
Wavy edges usually occur when your tension changes or you are accidentally adding extra stitches (increases) without realizing it. Count your stitches consistently to ensure you have the same number every row.
Should I count the turning chain as a stitch?
It depends on the pattern! Most designers will include a “pattern note” at the beginning of the document stating whether the chain counts as a stitch. When in doubt, follow the instructions in the first few lines of your pattern.
How do I know if my tension is correct?
Your fabric should be flexible. If it feels as stiff as a piece of cardboard, your tension is likely too tight. If it looks like a loose, messy net, try a smaller hook size to better match your yarn weight.
Is there a difference between U.S. and U.K. terms?
Yes, and it is vital! For example, a “double crochet” in U.S. terms is called a “treble crochet” in U.K. terms. Always check the terminology listed at the start of your pattern—most patterns will explicitly state which regional terminology they use.
Conclusion
Mastering the single, double, and treble stitches is arguably the biggest hurdle you will ever face in your crochet journey. Once these movements become “muscle memory,” you will find that you can pick up almost any pattern and immediately understand the anatomy of it. Crochet is such a beautiful, gentle way to slow down, create something unique, and add a little more warmth and comfort to your life and the lives of those you love.
Take your time, be patient with yourself when you make a mistake, and remember that even the most expert crocheters are constantly learning and growing. Your creative voice is unique, and as you build confidence with these foundational stitches, you will find yourself branching out into complex patterns and textures with ease. Keep your hook handy, keep your yarn stash cozy, and most importantly, enjoy the beautiful, rhythmic process of building stitches. Happy hooking!