
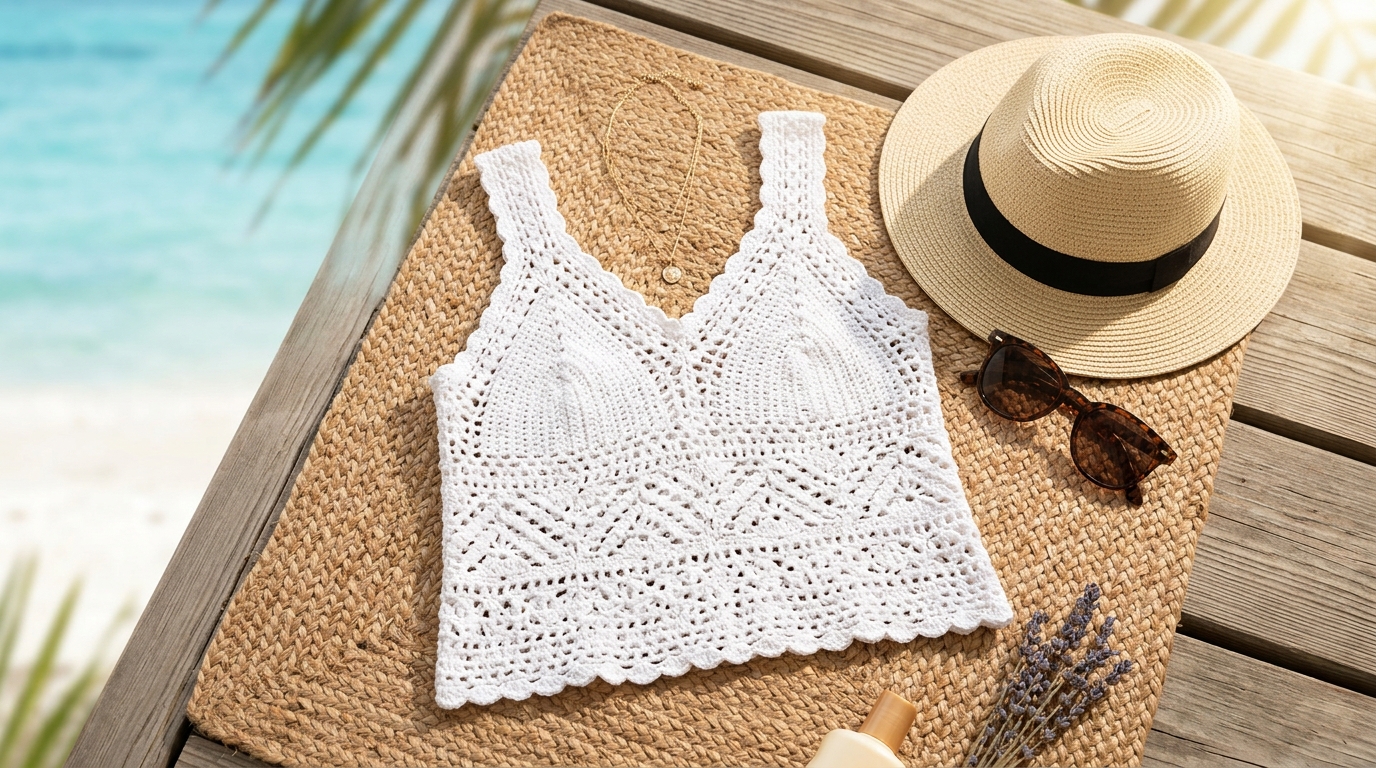
There is something uniquely magical about wearing a garment you have stitched with your own two hands. As the weather warms and the days grow longer, a lightweight, breathable tank top becomes the ultimate staple in a handmade wardrobe. Whether you are planning a beach day, a casual brunch with friends, or simply want to feel elegant while relaxing at home, a crochet lace tank top offers a sophisticated, feminine touch that you just cannot find in a store-bought piece.
If you have been looking for the perfect project to transition your crochet skills from accessories to wearable clothing, this lace tank top pattern is designed exactly for you. We will focus on creating a beautiful, airy texture that drapes gracefully against your body. This guide is crafted to be gentle on beginners while offering enough customization for intermediate crocheters to truly make the design their own. You don’t need to be an expert to create a professional-looking garment; you just need a bit of patience, some lovely yarn, and this step-by-step roadmap to guide you through the process of making your perfect summer shirt.
Quick Overview
- Skill Level: Beginner-Friendly Intermediate.
- Estimated Time: 12–18 hours of stitching time.
- Finished Size: Customizable (instructions provided for S, M, L, XL, and 2XL).
- Best Use: Summer outings, layering under cardigans, or elevated vacation wear.
- Why You’ll Love It: This pattern uses a repeatable lace stitch that grows quickly and is very forgiving for those new to garment construction, while the fit is designed to be flattering and easy to adjust.
Materials or Tools Needed
To create your tank top, you will want to choose a fiber that feels great against the skin in warm weather. I highly recommend a 100% cotton, bamboo, or linen-blend yarn in a “light fingering” or “sport” weight. These fibers don’t just feel cool; they provide the weightless drape necessary for lace patterns.
- Yarn: Approximately 600–900 yards (depending on size) of sport-weight yarn.
- Crochet Hook: Size G/6 (4.0 mm) or whichever size meets your gauge.
- Stitch Markers: To keep track of your armhole shaping.
- Measuring Tape: Essential for ensuring your tank fits your body perfectly.
- Tapestry Needle: For weaving in ends cleanly.
- Scissors: A sharp pair for finish work.
Crochet Terms and Stitches
We will be using standard American crochet terminology. Before starting, familiarize yourself with these key stitches:
- Chain (ch): The foundation of our lacy work.
- Single Crochet (sc): Used primarily for the ribbing and trim.
- Double Crochet (dc): The workhorse stitch for our lace section.
- Skip (sk): To create the holes in the lace pattern.
- Slip Stitch (sl st): For joining rounds or attaching straps.
- Stitch Marker: Used to help you identify where to start your armhole decreases.
Helpful Notes Before You Start
Garment making is all about the “fit.” Because everyone’s body is beautifully unique, I encourage you to measure your upper chest circumference before starting your base chain.
Gauge is your best friend here. Crochet a small square—roughly 4 inches by 4 inches—using the lace pattern described below. If your square is too small, move up a hook size; if it is too large, move down. Achieving the right gauge ensures your tank won’t end up too tight or overly baggy. Finally, remember that lace fabric has “memory” and will naturally stretch slightly once it is blocked or worn, so when in doubt, aim for a slightly snugger fit that will relax into place.
The Pattern
This tank is worked in two identical panels (front and back) that are sewn together at the sides and shoulders.
Part 1: The Foundation and Body
Row 1: Chain a multiple of 4, plus 2 stitches. (For a Medium size, 98 chains is a good starting point). Ensure your chain wraps comfortably around your torso comfortably.
Row 2: Double crochet in the 4th chain from your hook. Chain 1, skip 1 foundation chain, double crochet in the next 3 chains. Repeat this sequence until the end of the row. This creates the base of your lace.
Row 3 and beyond: Turn your work. Chain 3 (counts as your first dc). In the chain spaces created by the previous row, work your “lace shells”: 3 double crochets in the space, chain 1, skip the next stitch. Continue this across.
Work straight upward until your panel reaches your desired length—usually from your hip bone to your underarm.
Part 2: Shaping the Armholes
Once you reach the armpit, you will want to “decrease” to create that classic tank top silhouette.
Next 4 Rows: Slip stitch across the first 3 stitches of the row to narrow the piece. Then, work your lace pattern as established. This creates a gentle curve. Place a stitch marker at this point to ensure your front and back panels match perfectly. Continue straight for 6–8 inches to form the shoulder straps.
Part 3: Assembly
Lay your front and back panels flat, with the “right” sides facing each other. Using your tapestry needle and a length of matching yarn, whip stitch the side seams together from the bottom up. Stop at your stitch marker (the armhole). Sew the top of the shoulder straps together. Because this is a lace garment, keep your sewing seams relatively loose so the fabric maintains its natural drape.
Part 4: The Finishing Trim
To give your tank a polished, professional look, work a round of single crochet around the armholes and the neckline. Work 1 single crochet into every stitch, and 2 single crochets into the corners to keep the fabric from bunching. This “frame” not only makes the edges look clean, but it also helps the garment hold its shape wash after wash.
Step-by-Step Explanation
Think of this project in three distinct phases. First, you are building the “canvas”—that repeating lace pattern creates the body of your tank. Do not worry if the first few rows look a little loose; as you build upward, the stitches will pull together and create a sturdy, yet breathable fabric.
Second, the armhole shaping is simply about removing width so that the shirt follows the natural curve of your torso. By slip-stitching at the start of a row, you are essentially “cutting” into the fabric without having to snip any yarn!
Finally, the assembly is where it becomes a shirt. Pinning your pieces together before you sew is a game-changer. It prevents the fabric from shifting and ensures your seams are straight and your shoulders sit squarely on your frame.
Common Mistakes to Avoid
The most common hurdle in garment crochet is “tension creep.” This happens when your hand relaxes as you get more comfortable with the stitch, making the latter half of your project slightly looser than the beginning. To prevent this, try to sit in the same chair and keep your lighting consistent—doing all your crocheting at the same time of day can help keep your rhythm steady.
Another frequent error is the “twisted chain.” We have all been there! Before you join your first round or start working into your base chain, lay it flat on a table to ensure it hasn’t spiraled. A twisted foundation chain will result in a shirt that refuses to sit flat on your body, so take those extra five seconds to double-check.
Pro Tips for a Better Result
Blocking is the absolute secret to high-end crochet. Once your tank is finished, soak it in cool water with a tiny drop of wool wash. Gently squeeze out the excess water (never wring it!), lay it flat on a towel, and shape it to the dimensions you want. Pinning it in place while it dries will “open up” the lace stitches, making them look crisp and professional.
For a personalized fit, feel free to adjust the number of chain stitches in your straps. If you have a longer torso, you can add length easily by working a few extra rows before starting your armhole shaping. Crochet is a living medium—you are the architect of this piece!
Variations and Personalization
Want to change the look? Consider using a variegated yarn for a whimsical, painterly effect, or stick to a solid neutral like white or beige for a timeless, “old money” aesthetic. You can finish your tank with a thin satin ribbon woven through the top row of the neckline for a sweet, Victorian-inspired detail, or add a simple lace edging to the bottom hem for a bit of extra movement.
Care and Storage
Because this is a lace-weight garment, it deserves a bit of love when it leaves your body. Always fold your tank top rather than hanging it; over time, a hanger can stretch out the delicate shoulders. When it needs a wash, a quick hand-wash in cold water is best. Lay it flat away from direct sunlight to dry, and it will stay beautiful for many summers to come.
FAQ
Can I make this tank top longer to wear as a dress?
Absolutely! Simply continue the shell stitch pattern for as long as you desire. You may want to slightly increase the stitch count every 10 inches to allow for ease around the hips.
What if my gauge is off?
If your swatch is too large, go down one hook size. If it is too small, go up one. It is always better to spend twenty minutes on a gauge swatch than to spend twenty hours on a shirt that doesn’t fit!
Can beginners really make this?
Yes! The lace stitch used here is a standard pattern that repeats every row. If you can double crochet and chain, you have all the skills required.
How do I stop the edges from curling?
Adding a single crochet border around the bottom and armholes (as described in the finishing section) will add weight and structure, effectively stopping any natural curling of the lace.
Is it okay to use synthetic yarn?
While cotton or linen is better for moisture-wicking in the summer, if you are allergic to natural fibers, look for a “bamboo-blend” synthetic, which provides a similar cool-to-the-touch feel.
Conclusion
Creating your own crochet clothing is one of the most rewarding journeys a crafter can take. There is a specific kind of pride that comes from wearing something that was once just a single ball of yarn, transformed by your hands into a stylish, comfortable garment. I hope this tutorial has given you the confidence to start your tank top and perhaps the inspiration to experiment with your own modifications. Remember, every stitch is an opportunity to learn, and there is no such thing as a “perfect” project—only a project that is perfectly yours. Happy stitching, and I can’t wait to see you rocking your new handmade summer style!