
Introduction
There is something truly magical about the moment you move beyond simple, one-color projects and begin to paint with yarn. If you have ever looked at a crochet pattern featuring intricate geometric patterns, playful motifs, or crisp, clean lettering and wondered how it was possible to keep everything so neat, you have arrived at the right place. Tapestry crochet is one of the most rewarding techniques in the craft; it opens up a world of endless creativity, allowing you to turn your yarn into true fabric art.
Many crocheters feel a little intimidated by the idea of color changes and “carrying” yarn, often fearing tangled messes or messy color bleeds. I want to reassure you right now: this technique is much simpler than it looks! It is fundamentally just single crochet, mindful placement, and a little bit of patience. Whether you are a beginner looking to take your first steps into colorwork or an intermediate maker hoping to refine your tension and finishing, this guide is designed to walk you through the process with warmth and clarity. We are going to demystify the art of carrying yarn so you can create professional, beautiful crochet home decor, accessories, and garments that you will be proud to show off.
Quick Overview
In this guide, we are looking at the foundational principles of tapestry crochet. You will learn the mechanics of managing two or more strands of yarn simultaneously, how to maintain consistent tension while carrying the non-working color, and the secret to achieving those sharp, crisp color changes that make your work look polished. This guide is tailored for both beginners who are just starting to experiment with color and intermediate crocheters seeking tips to clean up their color transitions and edge finishes. Understanding these concepts is the key to creating vibrant visual designs without the headache of countless individual yarn ends to weave in later.
Tools You Will Need
While tapestry crochet is a relatively simple technique, having the right setup makes all the difference in your comfort and the final outcome of your piece.
- Yarn: For learning, I highly recommend using 100% smooth, worsted-weight acrylic or cotton yarn. Avoid fuzzy or mohair-style yarns, as the “halo” can hide your stitch definition and make it difficult to see the nuances of your color changes.
- Crochet Hook: Choose a hook that is one size smaller than what is recommended on your yarn label. This helps create a dense, sturdy fabric where the carried yarn doesn’t “peek through” the stitches.
- Stitch Markers: These are essential for keeping track of your rows, especially when working in rounds or tracking pattern repeats.
- Scissors and a Yarn Needle: Standard tools for finishing and weaving in your ends.
- Patience: This is arguably your most important tool! Treat your first few practice swatches as a low-stress space to learn.
Understanding the Basics
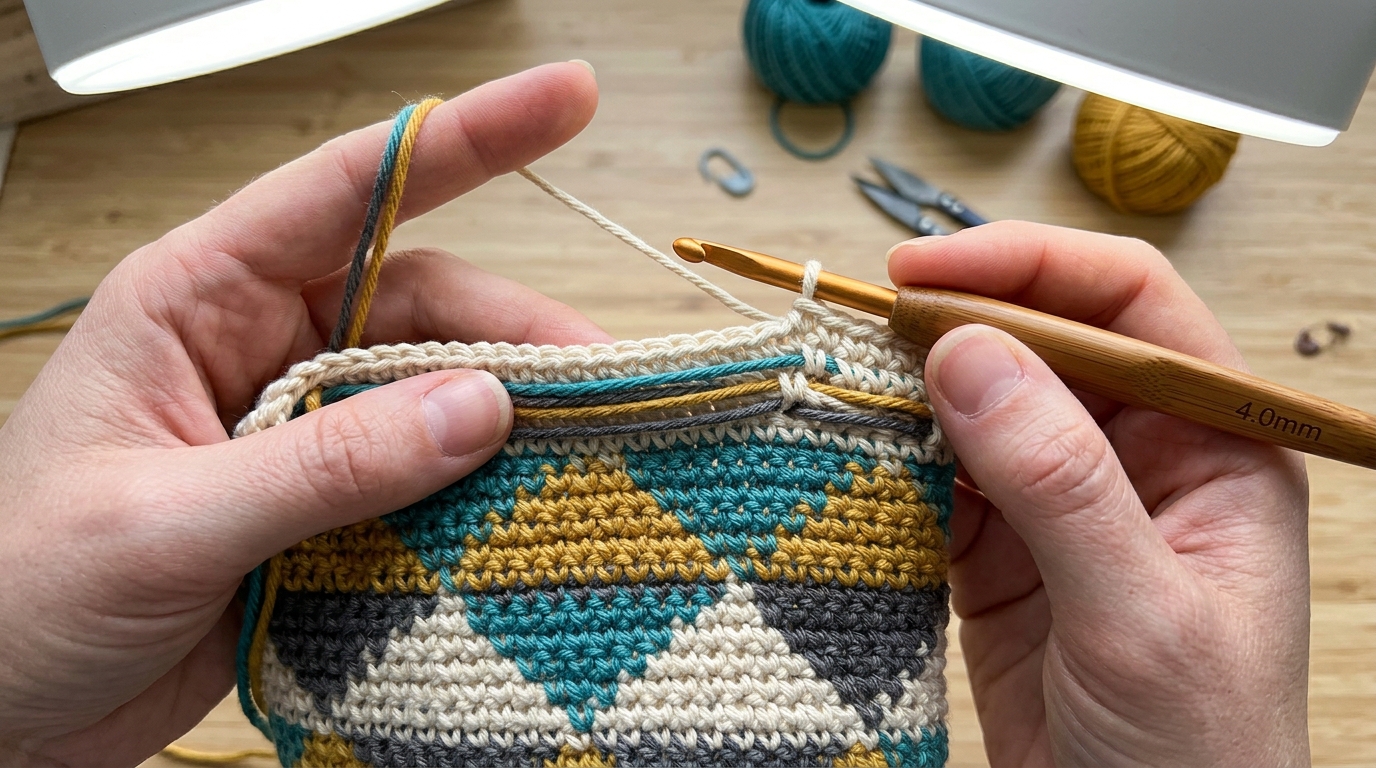
The core of tapestry crochet is working stitches over the “inactive” yarn—the color you aren’t using for a particular segment. By tucking that inactive strand inside your stitches as you work, you effectively hide it until you need it again.
When we talk about “carrying” the yarn, we mean holding the inactive strand along the top of your previous row and working your new stitches around it. Because you are essentially crocheting over a piece of yarn, your stitches will naturally be slightly thicker than in a single-color project. This makes tapestry crochet perfect for things that need structure, like baskets, tote bags, or sturdy mug cozies.
Helpful Notes Before You Start
Before you pick up your hook, let’s talk about tension. Tapestry crochet puts a slight demand on your hands. Because you are managing two strands, you may find your hands getting tired more quickly than usual. Take frequent breaks and remember to give your work a gentle “stretch” or pull on the carried yarn every few stitches. This ensures the carried yarn doesn’t create unwanted loops or ripples in your fabric.
Another important note: tapestry crochet is almost exclusively worked in single crochet. This creates the tightest, most uniform stitch, which is exactly what you want when you are trying to keep a pattern crisp. If you are working in rounds, you will notice a slight “slant” to your stitches. This is perfectly normal! It’s the nature of crocheting in the round with this method. If you want perfectly vertical lines, you may need to transition your pattern to flat rows, but for most projects, that slight slant adds a wonderful, organic, handmade charm.
The Mechanics of the Color Change
Mastering the color change is the “aha!” moment for every tapestry crocheter. To get that clean, sharp transition where the color swaps perfectly at the top of the stitch, follow this simple method:
- Prepare for the change: Work your single crochet until you are at the stitch immediately preceding the color swap.
- The final step of the stitch: Insert your hook into the next stitch, yarn over with your current color, and pull up a loop (you now have two loops on your hook).
- The swap: Instead of finishing the stitch with the old color, drop the old color to the back or leave it carried inside. Yarn over with your new color and pull that new loop through both loops on your hook to complete the single crochet.
- Continuing: Your next stitch will now be worked in the new color. Because you swapped loops at the very end of the previous stitch, the “top” of the stitch is already the new color, creating that seamless, professional transition.
Step-by-Step Guide for Practice
If you are new to this, start with a simple practice square. Choose two contrasting colors.
- Foundation: Start with a chain of 20 in Color A.
- Row 1: Single crochet across in Color A, carrying Color B underneath.
- Row 2: Turn your work. Work one single crochet in Color A, then use the color change method described above to switch to Color B. Work five stitches in Color B, switch back to Color A, and finish the row.
- Managing the Yarn: Always keep the unused yarn sitting along the row you are currently working on. Do not let it twist around your hook or get tangled with your working yarn. If you are working on a long stretch, gently pull on the carried yarn every few inches to keep it taut, otherwise, the fabric might pucker.
This simple exercise helps you get comfortable with the rhythm of dropping and picking up your yarn colors.
Common Mistakes to Avoid
Even experienced crocheters run into these, so don’t be hard on yourself if your first attempt isn’t perfect.
- Visible Carried Yarn: If the color you are carrying is peeking through between your stitches, your tension might be too loose, or you might need a slightly smaller hook.
- The “Tug” Effect: If your fabric is curling or feels stiff, you are likely pulling the carried yarn too tightly. You want it to lay flat behind your stitches, not be stretched like a rubber band.
- Twisted Yarn: If your two colors become a tangled mess, it is often because you are turning your work in the same direction every time. Whenever possible, try to flip your work like the page of a book to keep the yarn strands from twisting around each other.
- Ignoring Gauge: In tapestry crochet, your gauge is critical. Because you are carrying an extra strand, your piece will naturally be a bit smaller than a single-colored item of the same stitch count. Always check your gauge if you are following a pattern that requires specific dimensions.
Pro Tips for a Better Result
The secret to a beautifully finished tapestry project is in the details, starting with your yarn management. If you feel like your hands are getting overwhelmed, try using a dedicated yarn bowl or even two separate mugs to keep your yarn balls from rolling around and tangling.
Another pro tip: for larger projects, avoid carrying your yarn for too many stitches. If you have a massive gap between colors (say, more than 5 or 6 stitches), it is better to drop the color and “float” it, picking it up again on the next row, rather than carrying it the entire way. This saves weight and prevents the fabric from becoming overly thick. Finally, blocking your finished piece is transformative. Once you have finished your project, a light steam block or a gentle soak and pin will settle the stitches and make your colorwork look truly uniform.
Developing Your Color Palette
Tapestry crochet is a fantastic way to play with color. When choosing your palette, don’t be afraid to experiment with high-contrast combinations. A deep navy against a soft cream, or a forest green against a bright mustard, can look sophisticated and modern. If you are a beginner, stick to two colors to start. Once you feel comfortable managing two strands, you can branch out into three or more, but remember that for every extra color you carry, the thicker and heavier your final fabric will become.
Care and Next Steps
Once your project is complete, give it the care it deserves. If you have used acrylic yarn, you can usually machine wash your item on a gentle cycle, but I always recommend placing it in a mesh garment bag to prevent snagging. For natural fibers, hand washing in cool water is always the safest route. Lay your work flat to dry, and it will keep its shape beautifully for years to come.
Your next step? Pick a small project like a bookmark, a coaster, or a simple phone pouch. Practicing on a small scale allows you to see the results of your labor quickly. As you gain confidence, you can move on to larger items like tote bags or even blankets. Every stitch you take is a lesson, and with each one, your hands will grow more intuitive and your results more professional.
FAQ
Is tapestry crochet the same as intarsia?
No, they are different! In tapestry crochet, you carry the unused yarn along the entire project with you. In intarsia, you leave the unused color hanging and pick it up again when needed, which means you have many more ends to weave in at the end.
Why does my tapestry crochet look slanted?
The slant is a byproduct of working single crochet in the same direction for every row. It is completely normal in the craft and is often considered part of the “tapestry look.” If you want to minimize it, you can try working your stitches in a slightly different manner, but most people do not mind the lean once the project is finished.
Can I do tapestry crochet with different types of yarn?
Absolutely, but try to keep them of the same weight. If you try to carry a very thin thread behind a thick yarn, the thin one might disappear entirely while the thick one makes your stitches pop out unevenly. Sticking to the same weight and brand for all your colors ensures the best results.
How do I stop my yarn from tangling?
The best trick is to turn your work like a book (clockwise then counter-clockwise) rather than always turning it the same way. This keeps the yarns from wrapping around each other. You can also use separate containers for your yarn balls to prevent them from rolling across the floor.
Does tapestry crochet use more yarn than normal?
Yes, it does. Because you are carrying the inactive yarn behind your stitches, you are essentially doubling up your yarn usage in many areas. It is always wise to buy an extra ball of yarn than what a pattern might traditionally suggest, just to be safe.
Conclusion
Tapestry crochet is such a beautiful, rewarding extension of the stitches you already know. When you slow down and focus on how the yarn interacts with your hook, you transition from simply following instructions to truly crafting a piece of art. Don’t worry about perfection; focus on the rhythm of the color change and the satisfaction of watching your design appear row by row. Your handmade creations carry a piece of your heart, and by adding colorwork to your repertoire, you are adding even more depth and beauty to your craft. I hope you find as much joy in this technique as I have, and I truly cannot wait to see what you create next. Happy crocheting!