
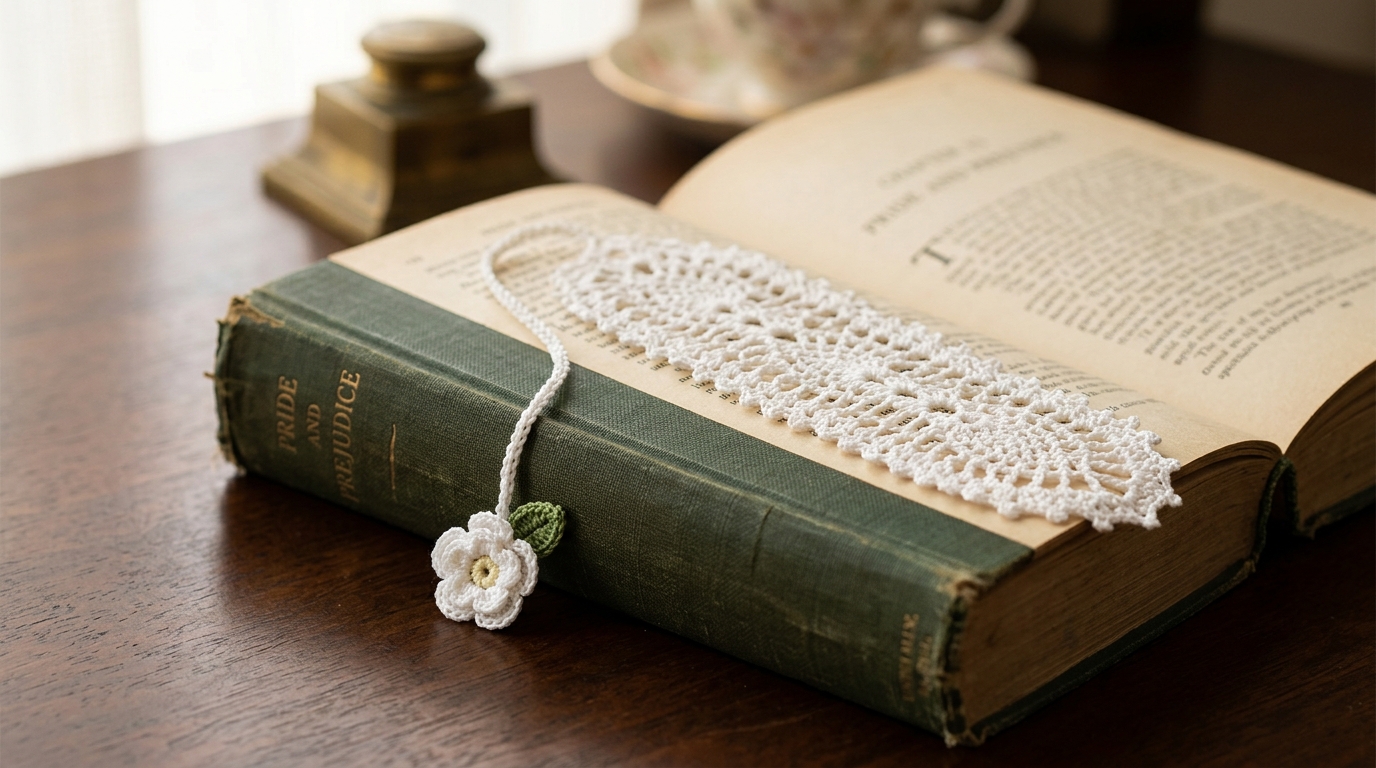
Making Every Page Magical: A Crochet Bookmark Tutorial
There is something truly soul-soothing about curling up with a good book while the afternoon sun filters through the window. For those of us who cherish the tactile experience of reading, a mass-produced paper bookmark just doesn’t feel like enough. Handmade crochet bookmarks are the perfect marriage of utility and charm—they are quick to work up, endlessly customizable, and carry a piece of your heart tucked between the pages of your favorite novel.
Whether you are a newcomer to the craft looking for your very first project or a seasoned crocheter wanting to whip up a stack of thoughtful gifts, this tutorial is designed to guide you through two timeless styles: a delicate lacy ribbon and a cheerful floral motif that blooms right on your page. These projects are delightfully small, making them an excellent way to use up those lovely scraps of leftover yarn tucked away in your stash. Let’s slow down, grab our hooks, and bring a touch of handmade magic to your reading nook.
Quick Overview
This project is perfect for crocheters of all levels. If you are a beginner, these patterns will help you practice consistency, counting, and the art of finishing a project with confidence.
- Skill Level: Beginner-Friendly
- Estimated Time: 30 to 45 minutes per bookmark
- Finished Size: Approximately 1 inch wide by 8 inches long (customizable)
- Best Use: Personal use, gifts for book clubs, teachers’ gifts, or party favors
- Why You’ll Love It: You can finish one in a single sitting, making it the ultimate “instant gratification” project that yields a polished, professional-looking accessory.
Materials and Tools Needed
One of the best things about making bookmarks is that they require very few materials. You likely have most of these items already!
- Yarn: Size 3 (Light) or Size 10 (Cotton Thread) work beautifully. 100% cotton is highly recommended because it holds its shape well and doesn’t stretch out over time, ensuring your bookmark remains crisp.
- Crochet Hook: If using Size 3 yarn, a 2.75mm (C) or 3.25mm (D) hook is perfect. If using cotton thread, use a 1.5mm to 1.75mm steel hook.
- Stitch Marker: Helpful for keeping track of your starting chains or the center of your flowers.
- Tapestry Needle: For weaving in those pesky ends neatly.
- Scissors: A sharp pair for precise trimming.
- Optional: A small decorative bead or a bit of embroidery floss for a tassel.
Understanding Your Stitches
We will be using standard U.S. crochet terms for this tutorial. If you are new to these terms, here is a quick refresher:
- Chain (ch): The foundation of most projects. Yarn over and pull through the loop on your hook.
- Single Crochet (sc): Insert your hook into the stitch, yarn over, pull up a loop, yarn over, and pull through both loops on the hook.
- Double Crochet (dc): Yarn over, insert hook, pull up a loop, yarn over, pull through two loops, yarn over, pull through remaining two loops.
- Slip Stitch (sl st): Insert hook into stitch, yarn over, pull through the stitch and the loop on your hook simultaneously. This is used for joining rounds or moving across your work without adding height.
- Fasten Off: Cut your yarn, yarn over one last time, and pull the whole tail through the final loop to secure it.
Helpful Notes Before You Start
Tension is everything when it comes to bookmarks. You want your stitches to be tight enough that the fabric isn’t floppy, but loose enough that the bookmark lays perfectly flat inside your book. If you find your work curling, try going up a half-size hook; if it feels too holey, drop down a half-size. Since these are small, don’t be afraid to pull out a few rows if the gauge doesn’t feel quite right—it’s the best way to develop a consistent hand!
The Classic Lace Ribbon Bookmark
This design uses a simple shell stitch to create a delicate, airy ribbon that looks sophisticated in a solid color or a soft gradient yarn.
Foundation
Start with a slip knot on your hook. Chain 11.
Row 1
In the fourth chain from the hook, work 1 double crochet. Chain 1, skip 1 chain, 1 double crochet in the next chain. Repeat until you reach the end of the chain. You should have a nice, open “mesh” base.
Row 2
Chain 3 (this counts as your first double crochet). Turn your work. In the first chain-1 space from the previous row, work 3 double crochets (making a “shell”). Skip the next double crochet and work 1 single crochet into the next chain-1 space. Repeat this shell pattern across the row.
Finishing the Ribbon
Repeat Row 2 until the bookmark reaches your desired length—usually about 7 to 8 inches. To finish, make one final slip stitch, fasten off, and weave in your ends carefully along the back of the double crochets.
The Blooming Floral Bookmark
Flowers add a whimsical, cottagecore aesthetic to any book. This pattern works top-down, starting with the petals and trailing down into a simple decorative stem.
Part 1: The Flower Head
Start by creating a magic ring (or chain 4 and join with a slip stitch to form a loop).
- Round 1: Chain 2, work 10 double crochets into the ring. Join with a slip stitch to the top of the beginning chain 2.
- Round 2: (Chain 3, skip 1 stitch, slip stitch in the next) repeated 5 times. You have created 5 small loops—these are your petals.
- Round 3: Into each loop, work (1 single crochet, 3 double crochets, 1 single crochet). Slip stitch into the base of the petal to secure it. Repeat for all 5 petals.
Part 2: The Stem
Once your flower is complete, do not cut the yarn. Slip stitch into the center of the back of the flower. Chain 40 (or until you reach your preferred length). Turn and, starting in the second chain from the hook, work a single crochet in every chain back toward the flower. This creates a sturdy, ribbed stem.
Assembly and Finishing
At the end of your stem, you can leave it plain or add a small leaf. To make a leaf, simply chain 4, work a slip stitch in the second chain from hook, a single crochet in the third, and a half-double crochet in the fourth. Fasten off and weave in all ends.
Step-by-Step Explanation of the Process
The beauty of a crochet bookmark is that it is essentially a “mini” version of larger projects. When you work the lace pattern, you are learning the foundation of the shell stitch, which is a staple in shawl and blanket patterns. When you make the floral bookmark, you are mastering working in the round and then transitioning into a linear stitch pattern for the stem.
If you are a beginner, watch your edges. It is very common for beginners to accidentally drop a stitch at the end of a row. If your bookmark starts looking like a triangle instead of a rectangle, you are likely missing that final stitch! Use a stitch marker on your turning chain to ensure you always know exactly where to place your last stitch of the row.
Common Mistakes to Avoid
Even experienced crocheters make mistakes! Here are a few to navigate:
- The Twisted Chain: When you join your starting row, ensure the chain loop isn’t twisted before you slip stitch. It’s a small detail that saves a lot of frustration later.
- Ignoring Gauge: While bookmarks don’t have to fit a person, they do need to fit a book. If you use a yarn that is too thick (like a bulky weight), your bookmark will create a “bump” in your book, which can warp the pages over time. Stick to cotton or fine-weight yarns.
- Tight Tension: If your bookmark is stiff as a board, you are crocheting too tightly. Relax your shoulders and try to let the yarn glide easily over your hook.
- Incorrect Weaving: Never just cut the end of the yarn and leave it. Always weave your ends in at least an inch in different directions to ensure they don’t pop out when you pull the bookmark from your book.
Pro Tips for a Polished Result
If you want your bookmarks to look like they came from a boutique, consider these final touches:
- Blocking is Your Best Friend: Once your bookmark is finished, give it a light steam or get it slightly damp and pin it flat on a towel while it dries. This smooths out any uneven stitches and makes the lace pattern pop beautifully.
- Starch for Crispness: If you prefer a stiffer feel, especially for the floral elements, a tiny spritz of fabric starch before blocking will give your flowers a professional, “held” shape that resists wilting.
- Color Selections: Use variegated yarn for the lace, but keep the flowers in solid, vibrant colors to make the details stand out.
- Embellishments: Don’t be afraid to experiment with adding a tiny wooden bead or a button at the base of the flower or the end of the ribbon for a little extra weight and elegance.
Variations and Personalization
The simplicity of these patterns is a blank canvas.
- Seasonal Switch-Up: Use deep reds and forest greens for a classic winter bookmark. Switch to soft pastels or bright florals for a spring reading companion.
- The Gift Factor: Attach a small card with the name of the book you are currently reading or a thoughtful quote to your bookmark when gifting it.
- Add a Tassel: At the bottom of the stem, attach a tiny tassel made from embroidery floss for a sophisticated, professional finish.
- Beads: If you are feeling adventurous, slide a few seed beads onto your yarn before you begin, and crochet them into the lace for a subtle, glimmering effect.
Care and Next Steps
To keep your bookmarks looking pristine, treat them like delicate garments. Hand wash them in cold water with a drop of gentle soap, lay them flat on a towel, and reshape them while damp.
Now that you have mastered these techniques, you are ready for bigger projects! The lace ribbon pattern is a great segue into learning how to crochet scarves, while the floral motif can be adapted to decorate hats, headbands, or even sewn onto a solid-colored throw pillow. Keep exploring your creative curiosity—every stitch you make is another step toward becoming the maker you want to be.
FAQ
How do I stop my bookmark from getting too long?
The easiest way is to measure it against a book you own as you work. Stop when you have about two inches of excess length on either side of the book to ensure the bookmark stays securely in place.
Can I change the yarn weight?
Absolutely! If you use a thicker yarn, just reduce the starting chain length and use a larger hook. The lace pattern will look chunkier and more rustic, which can also be very charming.
Does it matter if my yarn is wool or cotton?
For bookmarks, cotton is superior because it is less prone to “fuzzing” or shedding fibers inside your book pages. Wool can be a bit more delicate and may stretch unevenly.
My bookmark looks wavy. Is that normal?
If the lace pattern is slightly wavy on the edges, that is usually just the nature of the shell stitch. A quick block (as mentioned in the Pro Tips) will settle those curves and make the edge look straight and professional.
How many bookmarks can I make from one skein of yarn?
Because you only need a small amount of yarn for each, a single 50-gram ball of cotton yarn can easily yield 5 to 10 bookmarks, depending on the length of the tails and the complexity of the design.
Conclusion
Creating a handmade bookmark is one of the most rewarding ways to spend an hour. It is a quiet, meditative practice that rewards you with something beautiful and practical. Whether you are tucking these into your own books or sharing them as handmade gifts with the readers in your life, you are adding a personal, artistic touch to the stories held within those pages. Remember, the beauty of crochet is in the process—the rhythm of the hook, the texture of the yarn, and the joy of creating something uniquely yours. Happy reading, and even happier stitching!