
Introduction
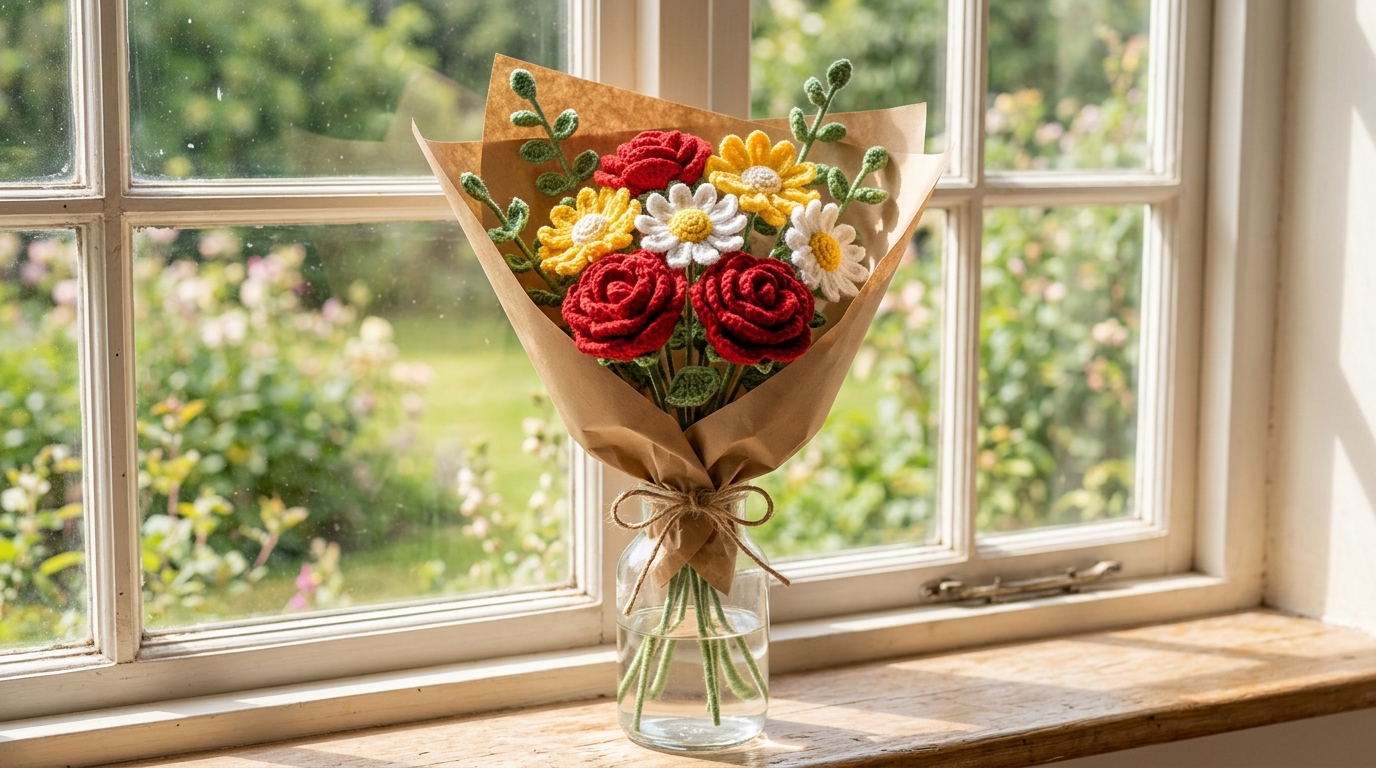
There is something profoundly magical about the act of creating flowers with your own two hands. While fresh blooms are undeniably beautiful, they are fleeting, wilting away just as we begin to fully appreciate their charm. A crochet flower bouquet, by contrast, is a labor of love that promises to last forever. Whether you are looking to brighten up a sunny windowsill, create a thoughtful handmade gift for a dear friend, or simply lose yourself in the meditative rhythm of a hook and yarn, these everlasting roses and daisies are the perfect project to embark upon.
If you are a beginner, please put aside any hesitation. Crochet flowers are perhaps the most rewarding projects for those just starting their fiber journey. They work up quickly, require only a small amount of yarn, and provide immediate, satisfying results. For the more experienced crocheters among us, this project offers a wonderful canvas for experimentation with textures, wire stems, and color palettes. In this guide, we will walk through the process of creating a charming bouquet that looks sophisticated yet remains entirely accessible. You will learn the foundational stitches needed to bring these petals to life, and I will share my favorite tips for assembly so your bouquet looks professional, polished, and ready for gifting.
Quick Overview
This project is perfectly suited for beginners who know basic stitches, as well as intermediate crocheters looking for a quick and rewarding “palate cleanser” between larger projects.
- Skill Level: Beginner-friendly.
- Estimated Time: 1 to 2 hours per flower.
- Finished Size: Customizable depending on yarn weight and hook size.
- Best Use: A heartfelt DIY gift, home decor, or a personal desk accessory to bring eternal spring to your space.
- Why You Will Love It: It is a low-pressure project that allows you to master shaping and floral assembly, and it is a fantastic way to use up those lovely little yarn scraps lingering in your stash.
Materials and Tools Needed
To create your bouquet, you do not need much, which makes this an incredibly budget-friendly endeavor.
- Yarn: Medium weight (worsted) cotton yarn is ideal because it holds its structure well. Cotton fiber provides the crisp definition that makes petals pop. Soft acrylics also work beautifully if you prefer a softer, fuzzier look.
- Crochet Hook: A size G (4.0mm) or H (5.0mm) hook usually works best for worsted weight yarn. If your flowers feel too loose, go down a hook size to create tighter stitches.
- Floral Wire: Green-covered 18 or 20 gauge wire for the stems.
- Tapestry Needle: For weaving in ends.
- Stitch Marker: Essential for keeping track of your rounds.
- Optional: Floral tape to wrap your stems for a clean, professional finish.
Crochet Terms and Key Concepts
Before we begin our stitches, let’s quickly brush up on the terminology. We use standard U.S. crochet terms throughout this pattern to keep things straightforward.
- Chain (ch): The foundation of most projects.
- Single Crochet (sc): A basic, tight stitch that gives your flowers body.
- Half Double Crochet (hdc): Offers a slightly taller, softer look.
- Double Crochet (dc): Used for creating larger, wider petals.
- Slip Stitch (sl st): Used to join rounds or move across the fabric without adding height.
- Increase (inc): Working two stitches into one space to grow your circle.
- Fasten off: Cutting your yarn and pulling the tail through the final loop to secure it.
Helpful Notes Before You Start
Tension is the secret ingredient in floral crochet. Because we want petals to stand up and hold their shape rather than drooping, you want your stitches to be relatively firm. Do not be afraid to pull your yarn a little snugly. If you find your flowers are floppy, try switching to a smaller hook size. If you are using floral wire, do not worry if the initial assembly feels a bit fiddly; it gets easier with practice. Finally, keep your yarn scraps; even if you only have a few yards of an accent color, it might be exactly what you need for a center bud or a leaf.
Main Tutorial: Creating Your Bouquet
Part 1: The Rose
The rose is worked in a long, flat strip and then coiled into a spiral to create the “bud” effect. This is a classic method that is much easier than it looks.
- Foundation: Chain 45.
- Row 1: Dc in the 4th chain from the hook, ch 1, skip 1 ch, (dc, ch 1, dc) in the next ch. Repeat from to until you reach the end of the chain.
- Row 2: Turn. Ch 3. In every ch-1 space from the previous row, work 5 dc. This creates the ruffled effect of the petals.
- Finishing: Fasten off, leaving a long tail of about 10 inches.
Assembly: Take your long tail and thread it onto your tapestry needle. Start at one end of your strip and begin to roll it tightly (or loosely, depending on how “opened” you want your rose to look) into a spiral. Use the needle and the long tail to sew through the base of the coils, securing the layers together as you go.
Part 2: The Daisy
Daisies are worked in rounds, starting from a center.
- Center: With yellow yarn, create a magic ring. Work 6 sc into the ring. Join with a sl st to the first sc. (6 sts)
- Round 1: Inc in every stitch around. (12 sts)
- Round 2: Join white yarn. Ch 8, sc in 2nd ch from hook, hdc in next 2 ch, dc in next 4 ch, sl st in base of the ch-8 chain. This creates one petal. Repeat around until you have 12 petals.
- Finishing: Fasten off and weave in your ends neatly.
Part 3: The Assembly
To turn these into a bouquet:
- Cut your floral wire to your desired stem length (usually 8-10 inches).
- Fold one end of the wire into a small loop to prevent it from poking through the center of your flower.
- Thread the stem through the bottom center of your flower. Secure the base of the flower to the wire using a bit of green yarn or floral tape, wrapping it tightly downward to cover the wire completely.
Step-by-Step Explanation
Think of this process in three distinct phases: the “body” of the flower, the “shaping,” and the “structuring.”
In the first phase, focus entirely on the stitch count. Even if your tension is a little off, accurate counts ensure the petal ruffle looks balanced. When you move to shaping, you are essentially mimicking nature. For the rose, the tighter you roll the center, the more “bud-like” it will appear. For the daisy, feel free to stretch your petals gently with your fingers—blocking them by steam-pressing lightly can also make a world of difference in their final look. Finally, when adding the stems, ensure the wire is firmly anchored. A drop of craft glue at the base of the flower can act as an extra safety measure if you plan on using these as a permanent home decor display.
Common Mistakes to Avoid
The most common pitfall for beginners is the “tight starting chain.” If your starting chain is too tight, your flower strip will be curved instead of straight. Try using a slightly larger hook just for your foundation chain to keep it flexible. Another issue is the “visible seaming.” When attaching your wire, take the time to wrap the stem carefully with floral tape or yarn so the silver wire doesn’t peek through, which keeps the bouquet looking realistic rather than homemade. Finally, don’t worry about “perfect” stitches. Nature is full of variations, and slight variances in your crochet work only make your hand-crafted blooms feel more organic.
Pro Tips for a Better Result
- Color Palette: For a sophisticated look, choose a cohesive palette. Think soft sage greens for stems, and perhaps shades of blush pink, cream, and dusty lavender for the petals.
- Stiffening: If you want your flowers to stand up straight even in a vase with no water, you can lightly mist the petals with a solution of water and white school glue, then set them in their desired shape to dry.
- Vary the Sizes: Make your bouquet stand out by creating roses in two sizes—one with fewer chains for a tiny, tight bud, and one with a longer chain for a full, blooming flower.
- Texture: Try incorporating a variegated yarn for the daisy petals to give them a subtle, natural depth.
Variations and Personalization
This pattern is a blank slate. You can customize the daisy by using different colors for the center, such as burnt orange or chocolate brown, or create a “wildflower” vibe by adding extra petals in different lengths. For the rose, consider crocheting a small leaf to attach to the stem. To make a leaf, simply chain 10, work sc in 2nd ch, hdc in next 2, dc in next 4, hdc in next 2, and sc in the last. A few handmade leaves tucked into your bouquet will add that final touch of realism that elevates the entire arrangement.
Care and Storage
Because these flowers are made of yarn, they are surprisingly durable. To clean them, simply dust them periodically with a dry, soft cloth or a gentle puff of air from a hairdryer on a cool setting. Avoid submerging them in water, as this can weaken the structure of the stems or cause the yarn to lose its shape. If they ever get slightly crushed during storage, a gentle steam-press with an iron (holding it several inches away) will bring the petals right back to life.
FAQ
How do I stop my crochet flowers from flopping over?
The key is using a smaller hook than recommended on the yarn label. This creates a denser fabric. If they still flop, you can use a slightly thicker gauge of floral wire or twist two pieces of wire together to create a stronger stem.
Can I wash my crochet flowers?
Yes, but hand-washing is best. Gently swish them in cool water with a tiny drop of dish soap, rinse without twisting, and lay them flat on a towel to air dry. Do not put them in the dryer, as the heat can soften the structure.
Do I need to use floral tape?
Floral tape gives the most professional, clean look, but it isn’t mandatory. If you don’t have it, you can wind green yarn around the wire, applying a thin bead of tacky glue as you wind to keep it in place.
What is the best yarn for these projects?
Cotton or a cotton-blend yarn is the gold standard for flowers because it doesn’t “fuzz” over time and holds its stitches firmly in place, ensuring your petals keep their shape indefinitely.
Can I make these if I am a total beginner?
Absolutely! These are perfect for practicing your foundational stitches. The rose is essentially just a long row of double crochet, which is a fantastic way to master height without worrying about complex increases or decreases.
Conclusion
Creating a crochet flower bouquet is more than just a craft project; it is an act of mindfulness. As you turn each loop and coil each petal into place, you are creating something that captures the beauty of nature while offering the permanence of art. There is no right or wrong way to design your bouquet—mix your colors, experiment with your stem lengths, and let your own creativity guide you. Whether you keep them in a favorite vase on your vanity or present them as a deeply personal gift to someone you love, these flowers carry a warmth that store-bought ones simply cannot replicate. So, pick up your favorite hook, find a quiet corner, and enjoy the process of growing your own everlasting garden. Happy stitching!