
Introduction
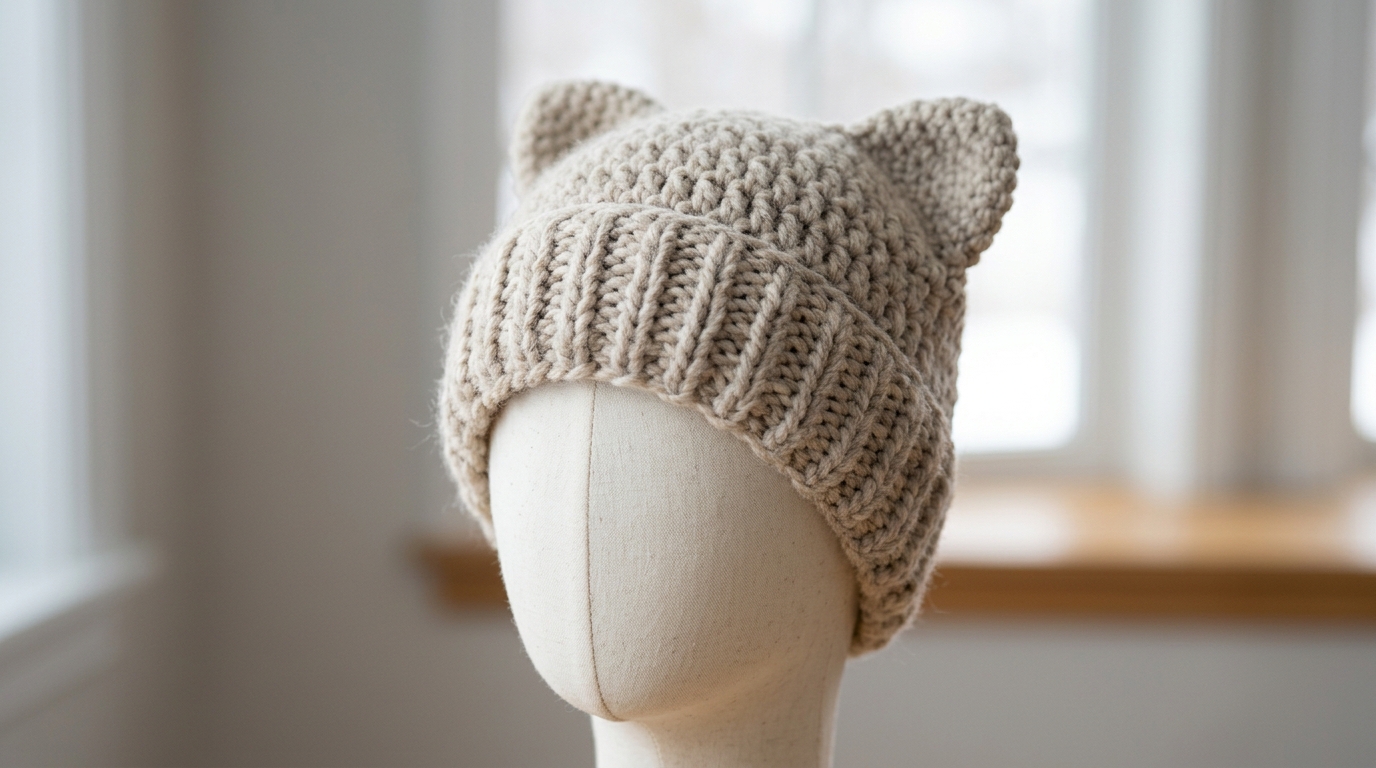
There is nothing quite like the feeling of finishing a project that is both practical and irresistibly cute. If you have been looking for the perfect weekend project to refresh your winter wardrobe, you have come to the right place. The cat ear beanie has become a quintessential staple in the modern handmade wardrobe, blending a touch of playful whimsy with the cozy, functional warmth we all crave when the temperatures drop. Whether you are walking through a brisk autumn park or curling up with a book on a snowy afternoon, this hat is designed to keep you snug and stylish.
The best part? This pattern is remarkably approachable. Even if you are relatively new to the world of crochet, you will find that the construction is straightforward, relying on simple rectangular panels that come together like magic. We will be using thick, chunky yarn, which means this project moves quickly, making it an excellent choice for a last-minute handmade gift or a little treat for yourself. I have designed this tutorial to be as supportive and gentle as possible, guiding you step-by-step from your first foundation chain to the final fluffy pom-pom. Let’s pick up our hooks, choose our favorite soft yarn, and create something truly cozy together.
Quick Overview
This project is tailored for those who want immediate, wearable results. Because we are using chunky weight yarn, you can expect to finish this hat in just a few hours.
- Skill Level: Beginner-Friendly.
- Estimated Time: 2 to 4 hours, depending on your speed.
- Finished Size: Customizable, but designed to fit an average adult head (approx. 20–22 inches circumference).
- Best Use: Cold winter days, casual outings, or gifting to friends who love a cute, cozy aesthetic.
- Why You’ll Love It: It’s a fast “instant gratification” project that requires minimal shaping and results in a high-fashion, boutique-style accessory.
Materials or Tools Needed
To create your chunky cat ear beanie, you will need a few basic supplies that are easy to find at any local craft store:
- Yarn: Approximately 200–250 yards of Super Bulky (Weight 6) yarn. Look for a wool blend or a soft acrylic for maximum comfort.
- Crochet Hook: Size N/P (10.0mm) hook. This size is essential for achieving that characteristic “chunky” drape.
- Tapestry Needle: A large-eye sewing needle for weaving in ends and seaming.
- Stitch Markers: Very helpful for keeping track of your corners if you are new to the pattern.
- Scissors: Any sharp pair will do.
- Optional: A faux fur pom-pom or a cardboard cutout if you want to make your own yarn pom-pom for the top!
Crochet Terms, Stitches, or Key Concepts
Before we begin, let’s quickly refresh the key terms used in this pattern to ensure you feel confident moving forward:
- Chain (ch): The foundation of most crochet projects.
- Half Double Crochet (hdc): This is the “workhorse” stitch of this hat. It is a bit taller than a single crochet but shorter than a double, providing a dense, warm fabric without being too stiff.
- Slip Stitch (sl st): Used for joining seams or moving the yarn across a row without creating height.
- Back Loop Only (BLO): By inserting your hook only into the back loop of the stitch, you create a beautiful “ribbed” texture that gives the hat both stretch and a professional, store-bought appearance.
- Gauge: Because everyone’s tension varies, I recommend checking your gauge early. If your swatch looks too loose, size down your hook; if it feels too tight to work with, size up.
Helpful Notes Before You Start
- Tension: Since this is a wearable item, try to keep your stitches consistent. If you tend to crochet tightly, consciously relax your shoulders and try to “pull up the loop” a little higher on your hook for each stitch.
- Joining: We are working this as one large rectangle. Don’t panic when you look at the flat fabric—it will look like a long scarf before it turns into a hat!
- Customization: If you have a larger head size, simply add a few more chains to your foundation row. If you want a slouchier fit, add more rows to the total length of the rectangle.
Main Tutorial
Part 1: The Foundation
Start by making a slip knot and placing it on your hook. Chain 32 (or more if you want a longer, slouchier beanie). This chain represents the height of your hat.
Part 2: Creating the Body
Row 1: Hdc in the 3rd chain from the hook and each chain across. Chain 2 and turn your work. (30 stitches total).
Row 2 (The Ribbing): Hdc in the BLO of each stitch across. Chain 2 and turn.
Row 3 and onwards: Repeat Row 2 until your piece measures approximately 18 to 20 inches wide when laid flat. This width should be enough to wrap comfortably around your head. Do not fasten off; just pull up a long loop so it doesn’t unravel while we move to the next step.
Assembly
Lay your rectangle flat. Fold it in half so that the short ends (the sides of your rectangle) meet. You should now have a folded square. Using your tapestry needle and a long tail of yarn, seam the side that is currently open (your “side seam”). Once that is done, turn the hat inside out so the seam is hidden on the inside.
Forming the Cat Ears
Now, look at the top edge of your rectangle. You have a long, open tube. Fold the top of the tube so that the front and back center points touch (this creates the “cat ear” silhouette). Use your tapestry needle to whip-stitch across the top of both “ears.” You are sewing through both layers of the fabric, closing the top completely. As you sew, the corners will naturally perk up to form those iconic cat ear points.
Finishing
Turn the hat right-side out. Weave in all loose ends securely into the fabric on the inside of the hat. Give it a nice little tug to ensure the seams are solid. If you’ve chosen to add a pom-pom, secure it at the very top center between the two ears, or simply leave it as a sleek, modern silhouette.
Step-by-Step Explanation
Think of this project as a simple puzzle. You are crocheting a rectangle that is roughly twice as wide as the desired height of your hat. When you fold that rectangle in half like a taco and sew the sides, you have an instant bonnet shape. The “cat ears” are purely a result of how you pinch and sew the top edge. By pinching the top corners inward and sewing them closed, the natural tension of the fabric forces the corners to stand up on their own, creating that adorable feline look without needing any complicated shaping or increases.
Common Mistakes to Avoid
- Twisted Foundation: Watch your starting chain carefully. If you twist it before your first row, your hat will have a permanent, uncomfortable spiral.
- Tension Variations: It is common for beginners to start a row with loose tension and end with tight tension. If you notice your rectangle is wider at one end than the other, take a deep breath and aim for uniform pull on every stitch.
- Counting Stitches: Even in a simple rectangle, it’s easy to drop a stitch at the end of a row. Always count your stitches at the end of every row until you are confident with the pattern.
- Wrong Hook Size: Do not try to use a standard small hook for this project. The bulkiness of the yarn is what makes the hat stand up properly. If you use a hook that is too small, the fabric will be too stiff and will not drape correctly over your ears.
Pro Tips for a Better Result
- Blocking: If your edges look a little uneven, you can lightly steam-block the finished hat. This relaxes the fibers and softens the finished look significantly.
- Color Blocking: Since the hat is worked in rows, you can easily switch colors every 5 or 10 rows to create a beautiful striped effect.
- Texture: If you find the half double crochet too simple, you can experiment with alternating rows of single crochet and double crochet to create a subtle, textured “waffle” effect.
- Comfort: When seaming the top, try not to pull your thread too tightly. You want the ears to be sturdy, but if you pull too hard, you’ll pucker the fabric and lose that lovely, cozy slouch.
Variations, Examples, or Personalization Ideas
The beauty of this project is how easily it can be personalized. For a more sophisticated look, use a solid neutral color like cream, charcoal, or dusty rose. If you want something trendier, variegated yarn or a bright pop of mustard yellow looks wonderful.
You can also add embellishments! Consider sewing small felt triangles inside the ears for a different texture, or embroidering a small face or tiny whiskers on the front of the hat once it is assembled. For intermediate crocheters, you might want to try working the hat using a “velvet” yarn for a super-soft, luxurious finish, or swapping the half double crochet for a ribbed stitch to give it a more athletic, beanie-style look. Because the pattern is so basic, it really is a blank canvas for your creative vision.
Care, Storage, or Next Steps
Because your cat ear beanie is handmade, it will last longer with a bit of love. If you used an acrylic blend, it is likely machine washable, but I always recommend hand washing in cool water with a gentle detergent to keep the stitches looking crisp. Lay it flat on a clean towel to dry—never hang your crochet hats, as the weight of the water can cause them to stretch out of shape.
Once dry, store it in a cool, dry place. If you find yourself enjoying the process of making these, your next steps could be trying a matching pair of chunky fingerless gloves or perhaps a simple infinity scarf to complete your winter set. You now have the skills to tackle patterns with more complex shapes, so keep experimenting!
FAQ
How do I know if the hat will fit my head?
The easiest way is to wrap your foundation chain around your head comfortably. It should feel snug but not tight. Since crochet generally has some stretch, you don’t want it to be overly loose, or it will slide off.
What if I don’t have super bulky yarn?
You can hold two strands of worsted weight (medium) yarn together to mimic the thickness of super bulky yarn. It’s a great way to use up bits and pieces from your stash!
Do I have to use the Back Loop Only (BLO) method?
Not at all! Using both loops will produce a solid, dense fabric that is slightly less stretchy but very warm. Using the back loop only creates that lovely “ribbed” texture and adds extra elasticity to the hat.
Can I make this for a child?
Absolutely. Just make your starting chain shorter (about 20–25 chains) and sew fewer rows. You can measure against an existing hat that fits the child well to get the perfect dimensions.
My ears don’t look pointed; what did I do wrong?
The “point” comes from the way you sew the top together. Make sure you are pinching the opposite corners of the top edge together so that the seam creates a triangle shape rather than a flat line.
Conclusion
Creating your own cat ear beanie is such a rewarding way to spend a few hours. There is a special kind of pride that comes from wearing something you made with your own two hands, especially when it’s as cute and cozy as this. Don’t worry if your first attempt isn’t absolutely perfect; part of the charm of handmade items is the unique character that every crocheter brings to their work.
I encourage you to reach for your favorite color, pull up a comfortable chair, and enjoy the rhythm of your stitches. Once you master this simple construction, you will reach for this pattern again and again—it truly is the gift that keeps on giving, whether you are keeping your own ears warm or surprising a friend with a thoughtful, handmade treat. Happy crocheting!